Customizing the FRACAS Interface
If you would like to review a video overview about customizing the user interface, go to our online video for Customizing Interface Tables or online video for Customizing Interface Forms.
The Relyence FRACAS interface is completely customizable. You can customize both the FRACAS Tables and FRACAS Forms.
FRACAS processes vary widely from organization to organization and may even change over time as your process develops. Our implementation team can help you in customizing the Relyence FRACAS interface to meet your needs. We can also aid in defining your process or establishing a new FRACAS. Feel free to contact us for details.
Customizing Tables
The Relyence Customize view feature enables you to set up your Tables to appear as you prefer. You can select which columns appear, the order in which they appear, their width, and change their titles.
Your customization settings are saved as different named "Views". The term "Views" is used to refer to your customized views of your Analysis data.
Views are saved independently for each Analysis. This way, you can configure your View to your preferences.
To access the customizing feature, click the Customize view function that appears in the Views dropdown menu that appears in the upper right corner of the Relyence toolbar.
.jpg)
This shows the Views dropdown list and Customize view option when the Relyence Incident Table is active.
Relyence supplies at least one View for each Relyence Product. You can use these supplied Views without modification, modify them directly, create a custom View using the supplied ones as a base, or simply create an entirely new View of your own.
Note: If you click Customize view when a Relyence supplied View is active, you will be asked if you want to Change This View or Create New View. If you choose to create a new View, Relyence will automatically copy all the data fields in the current View to the new View.
Selecting Views
Each View must be uniquely named. Once a View is created, it will automatically appear in the View dropdown list. The currently active View will appear with a small checkbox to the right of its name.
To change to a different View, click on its name in the View dropdown list. Note that changing Views does not change your data in anyway, it simply changes which fields you are viewing. Your data is not lost if the field does not appear in a View.
Creating new Views
To create a new View, click Create new view from the View dropdown. The Create View dialog appears.
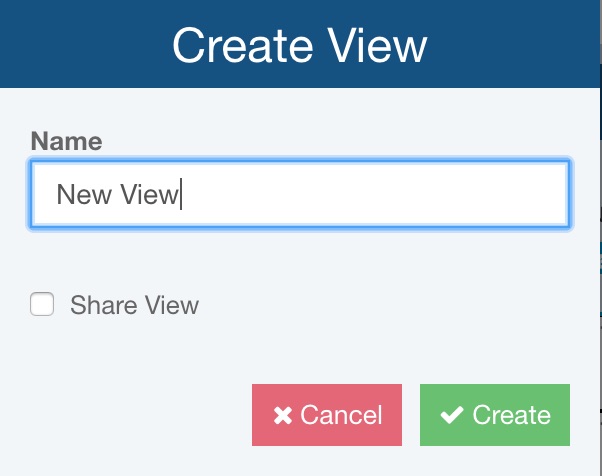
Enter a name for your new View. If you want this new View to be shared with team members, select the Share View checkbox and enter the Groups to share your View with. Otherwise, leave the Share View checkbox cleared to keep your new View only available to you.
Click Create to create your new View.
Customizing Views
The Customize view table opens. Below is the Customize view shown when the Incident Table view is active.
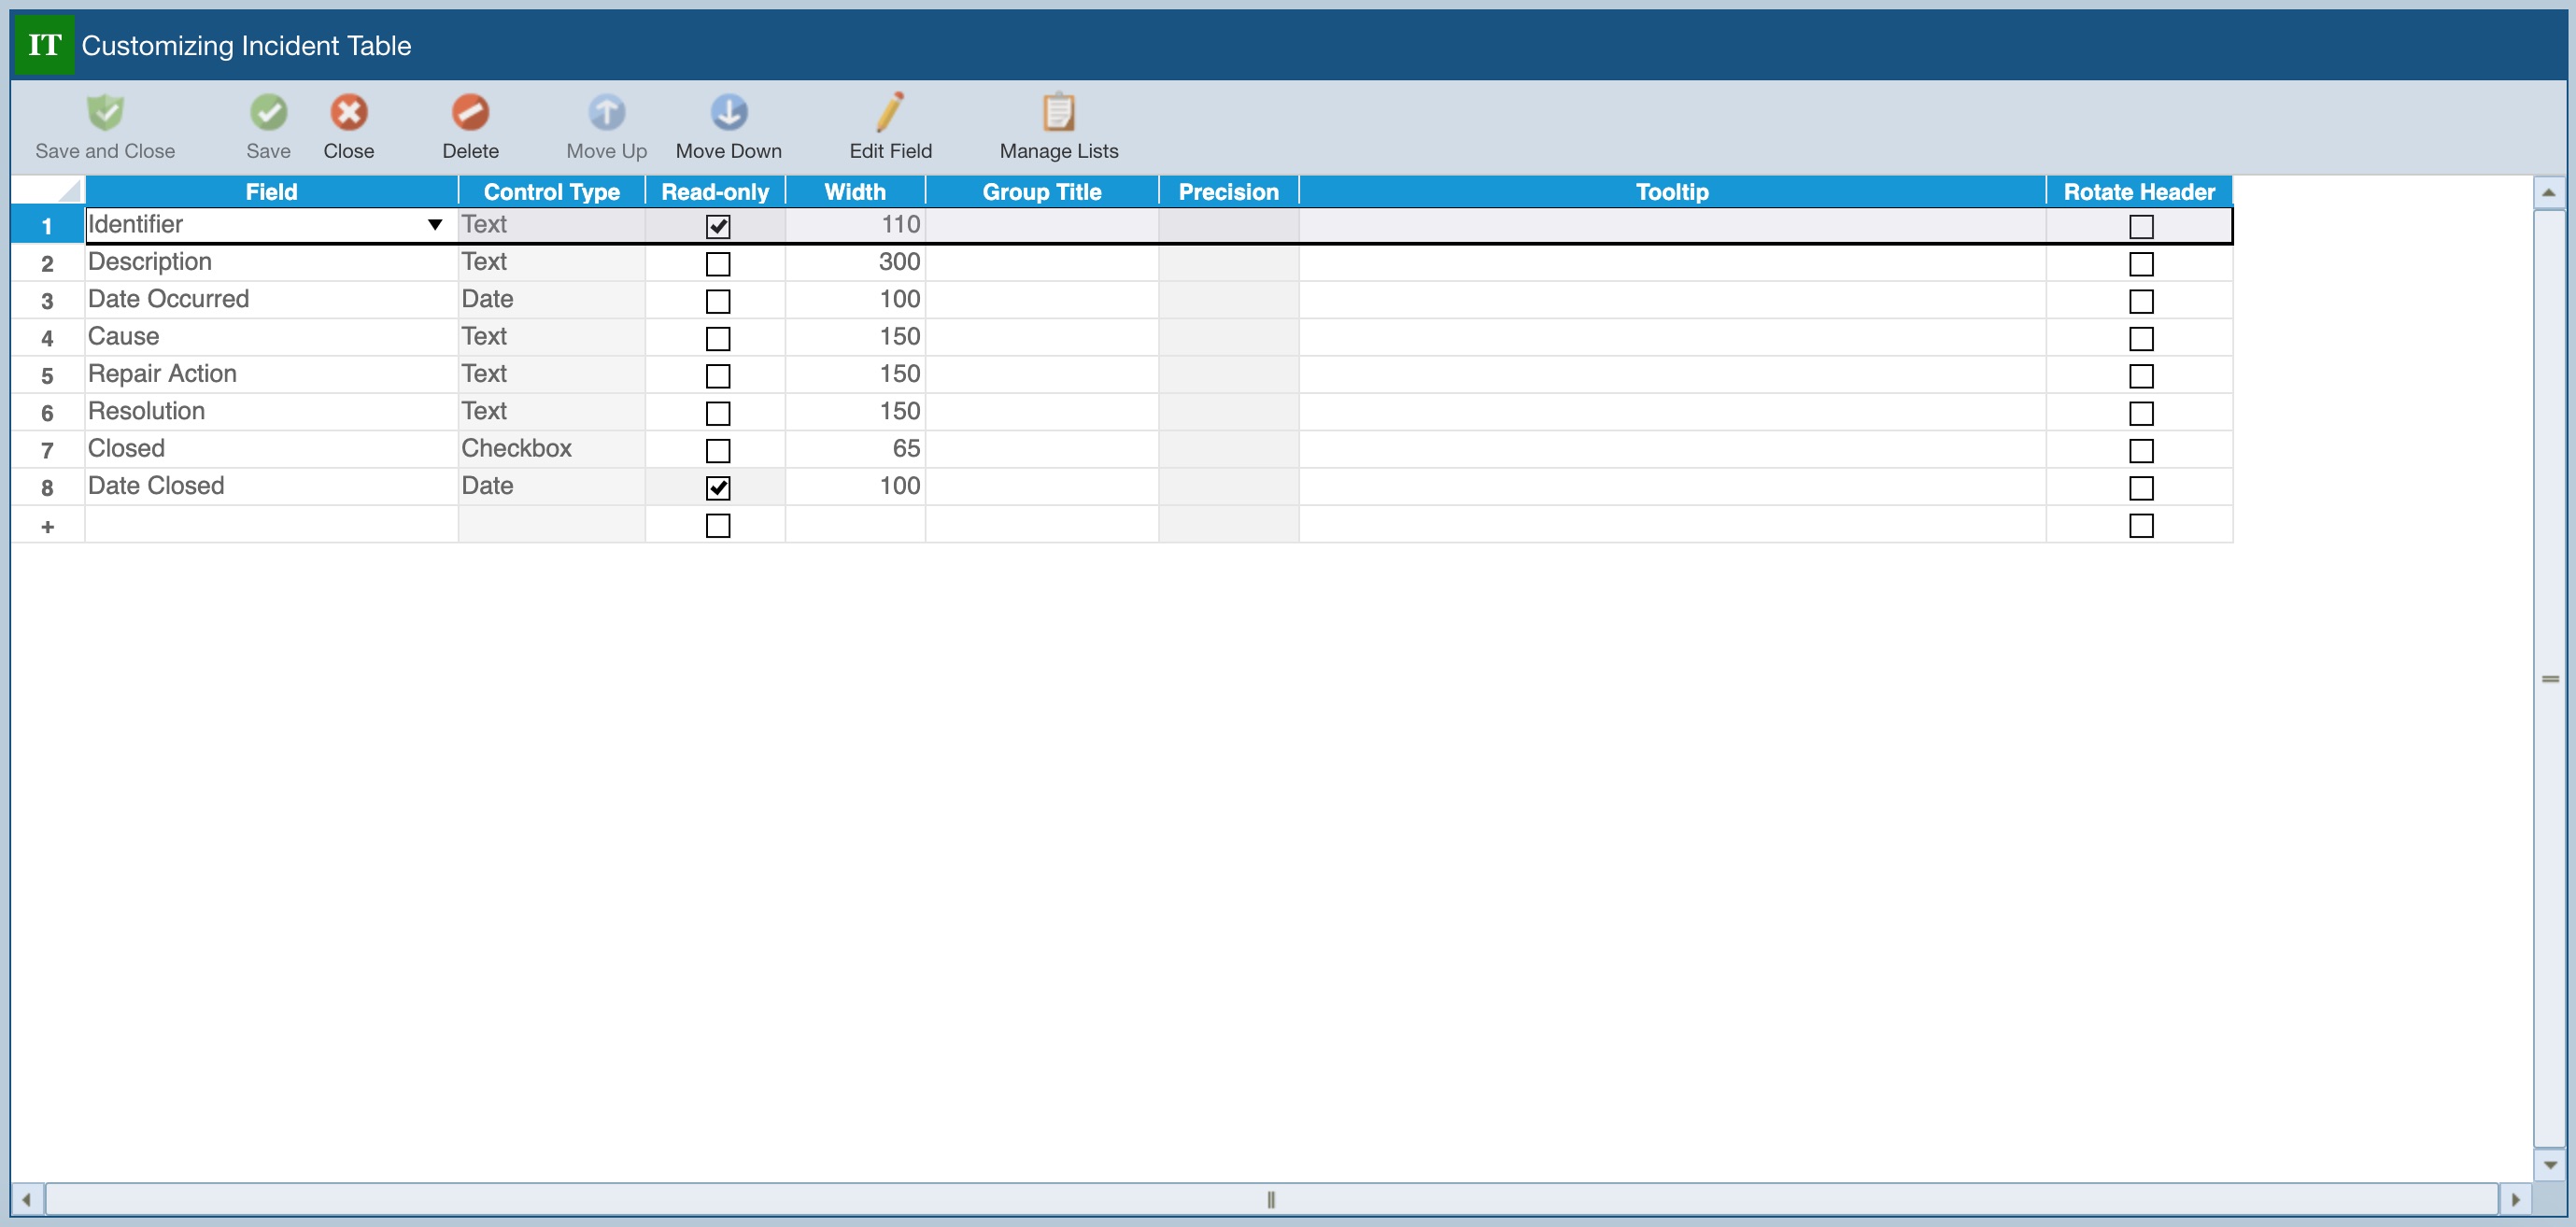
A list of fields to be displayed on the Table is shown. The order of display will follow the order they appear in this list. By default, your new View will be set up with the fields from the current View already added. This is just to give you an easy starting point for creating your View.
If you do not want to start based on the current View, you can delete all the fields in the table. To delete a field, select the corresponding row and click Delete from the toolbar.
To reorder the fields, select the row with the field you want to move and use the Move Up or Move Down toolbar button.
To change the column label for the field, select the field in the table, and click Edit Field from the toolbar.
To customize list and dependent list details for fields, click Manage Lists from the toolbar. For more details see Using the Manage Lists Dialog for Lists and Dependent Lists.
For Views not supplied by default by Relyence, if you want to change the Share View setting of the View, click the Share View button in the toolbar. The Share View dialog appears with the name of this view. Either select the Share View checkbox and select the Groups you want to share this View with or clear the Share View checkbox to no longer share this View. By default, your custom Views are only available to you.
Adding Fields to Views
To add a field to the Table, go to the last (empty) row in the table and click the dropdown arrow in the Field column. You can also click the + in the last (empty) row and the list of available Fields will be displayed. If you do not see the field you want to add in the list, click <Add New Field>. The Edit Field dialog appears, and you can enter the name of your field and select its type.
Then fill in the data accordingly:
Field: The list of available data fields not already in use will be displayed. Select the desired field from the list to add it.
Control Type: This data is not editable; it is there for informational purposes to let you see what type of field you have selected.
Read-Only: If you want the field to be Read-Only, select the Read-Only checkbox. This will prevent this field from being modified.
Width: You can set the width of the field by entering a width value. You can also resize the columns directly on the Table itself and the new size will be automatically saved. So, you do not have to worry about entering an exact amount in the Width column.
Group Title: You can group fields together under a common heading in your Table. In the example above, you can see that the two fields Prevention Controls and Detection Controls have a common title of Design Controls. The Group Title will appear above the grouped fields and span across their columns in the Table.
Precision: Enter the Precision, or number of digits after the decimal place, for number fields.
Default Value: Enter a value if you would like this data field to have a default value automatically set. If left blank, the Relyence default will be used.
Tooltip: The tooltip text will appear when you hover your mouse over the column header in the Table. Tooltips can be used to provide helpful hints to users about the data expected in this column.
Rotate Header: If you want to rotate the header, or the title of a column, by 90 degrees, select the Rotate Header checkbox. This applies to both the on screen display as well as reports generated from this View. This option is helpful when trying to condense the width of columns. For example, in the View above the third column title (Failure Mode Severity) is very long, while the data in the column (a value between 1 and 10) is small. By selecting Rotate Header for this column, the width of the column can be resized down to 125 to 25.
When you have completed designing your View, click Save to save your changes, or click Save and Close to save your changes, close the Customize window, and return to the Table.
Deleting Views
You can delete Views at any time. Click Delete view from the View dropdown to delete the currently active View. You will be asked if you are sure prior to deleting. Click Yes to permanently delete the View. Relyence will then switch to the first View in the list.
Customizing the Relyence Default Views
If you prefer, you can customize the Relyence Default Views. This way, you do not have to create your own Views, but modify the default Views to meet your needs. To customize the default View, click Customize while the View you wish to modify is active. The Customize View dialog appears.
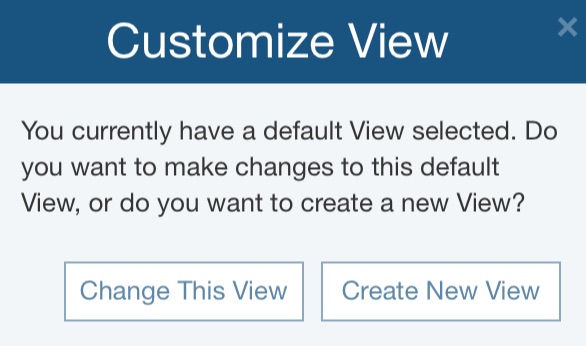
Click Change This View. The Customize view window will open. From this point, you customize the View in the same manner as described above.
When you change the labels in any of the Relyence default Views, that label will be used throughout all your Views for that data field.
Managing Views
Relyence provides default Table Views in each Analysis to help you get started, but then allows you to add and customize Views to get the look and feel you need. The Relyence View Manager allows you to rename, reorder, share, hide and delete the Views for each table for a flexible, custom experience.
The Relyence View Manager is available for Table Views in Analyses and in Knowledge Banks.
For more details, see View Manager.
Customizing Forms
All the forms in Relyence FRACAS can be customized. There are two sets of forms used in Relyence FRACAS: Incident Forms and Problem Forms. You can customize each set of forms. The two types of forms are independent, however, the method used for customization is the same for both. For explanation, we will use Problems, please just note that the same procedure applies for Incidents as well.
If you are not already on the FRACAS Problems Form tab, activate Relyence FRACAS, click on the Problem Table tab, and then click To Form to go to FRACAS Problems Form tab.
Click Customize in the upper right corner.

The Customizing Problem Form window appears.
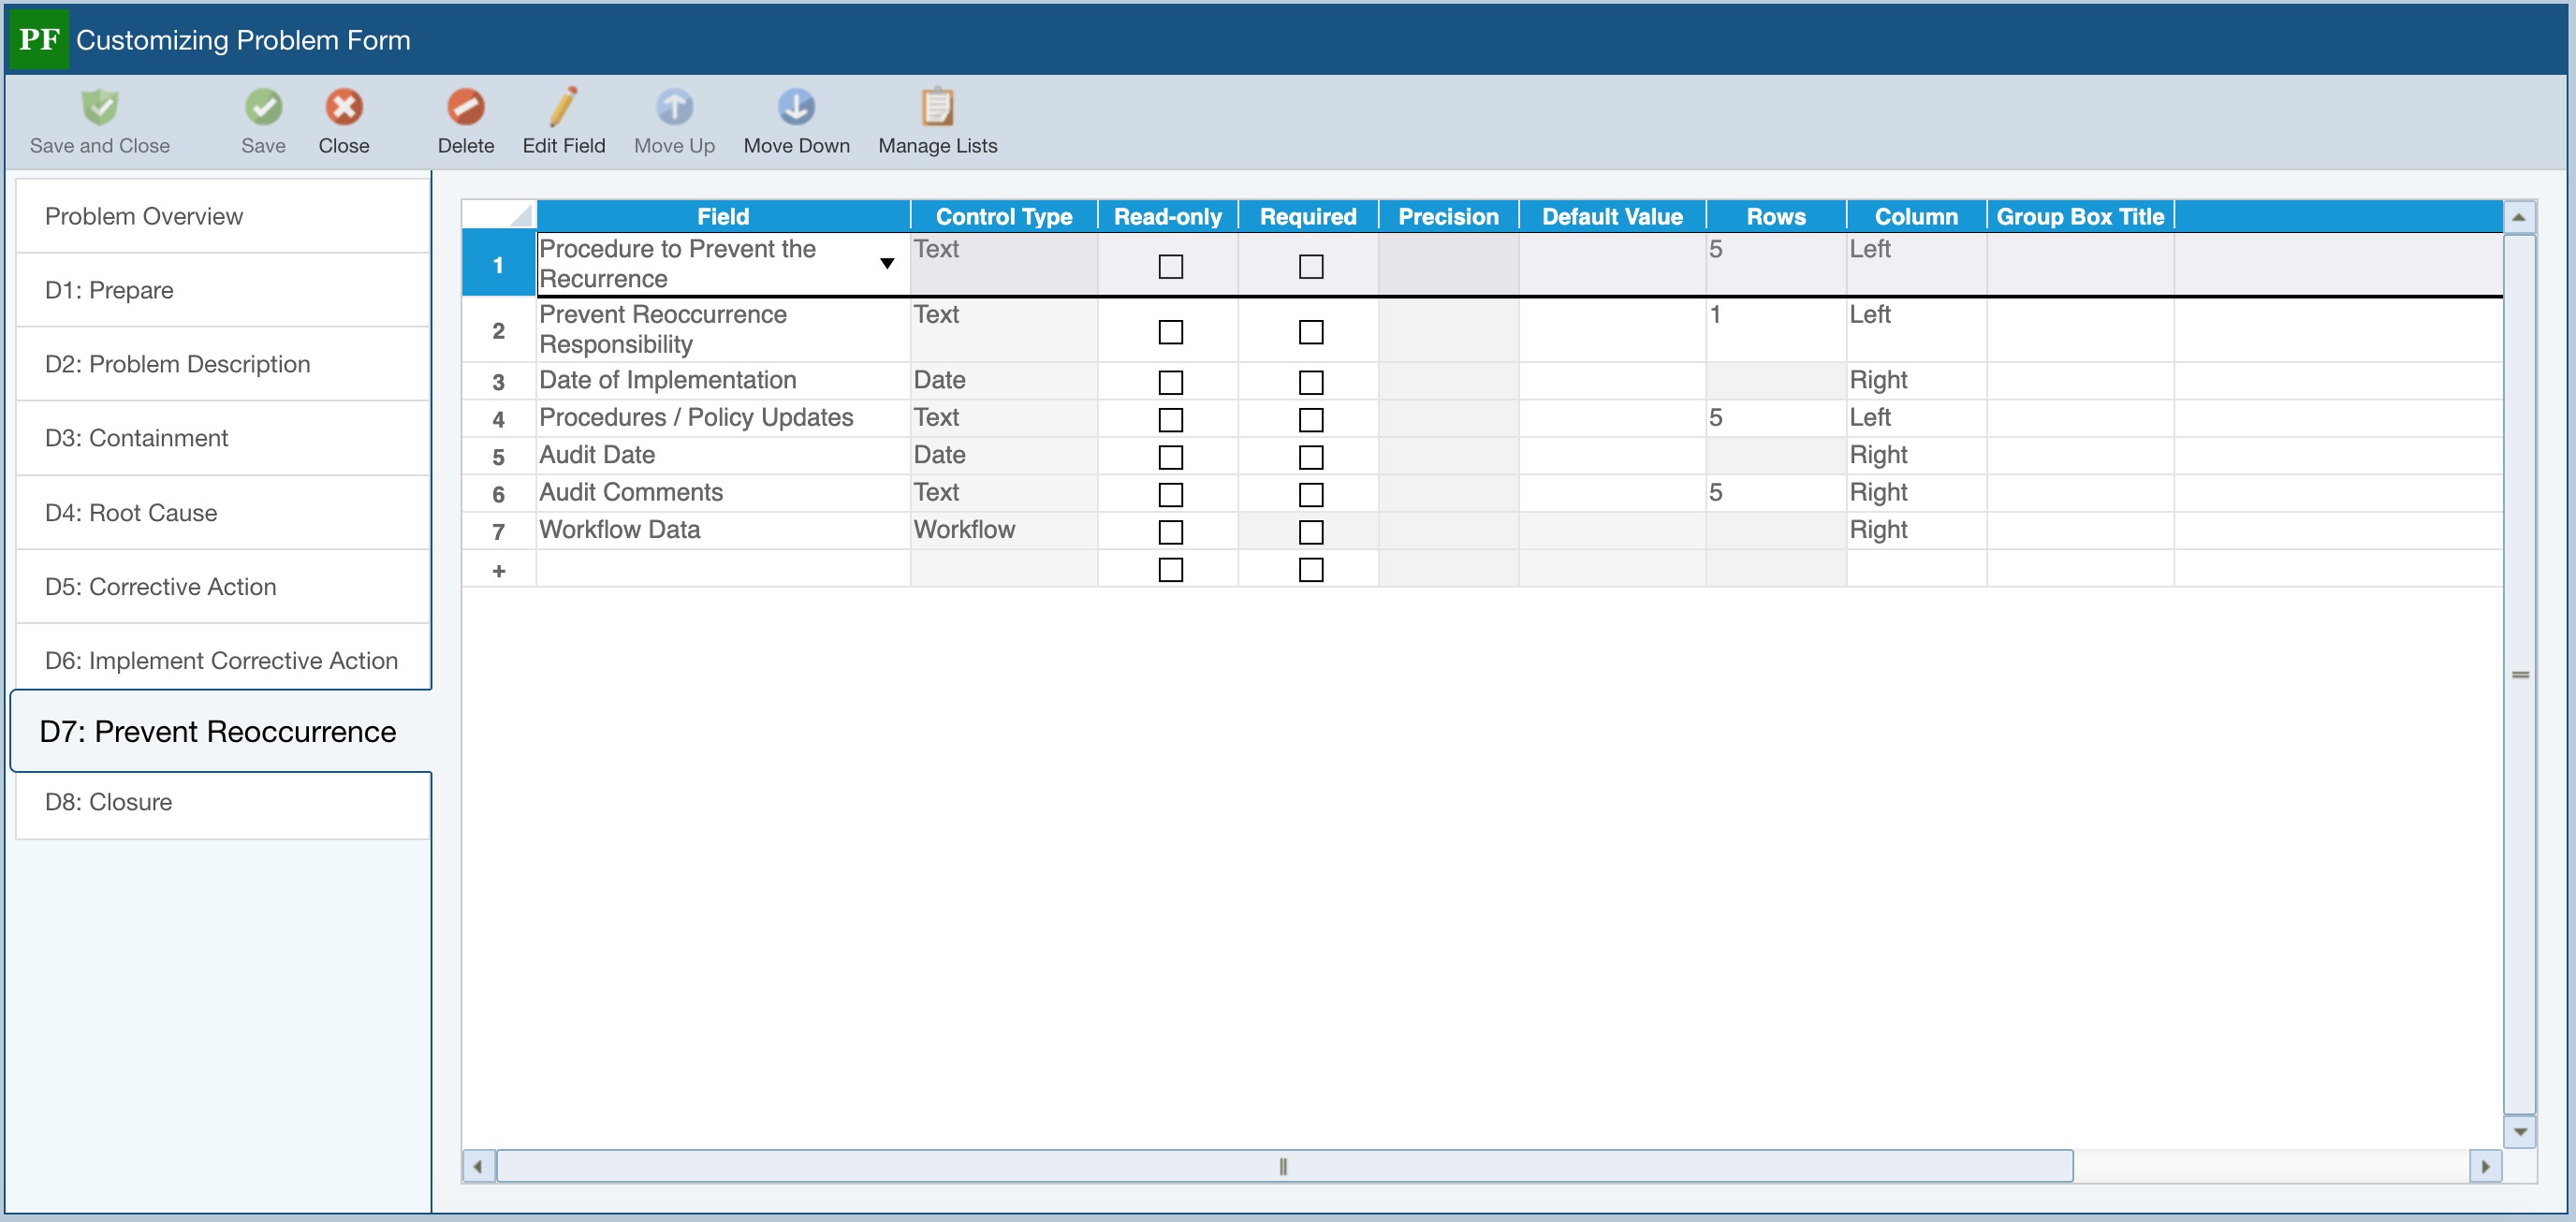
For Incidents and Problems, you may have more than one form to manage the steps in your FRACAS process.
Also note that for both Incidents and Problems, you can define multiple Workflows - for more details see FRACAS Workflow and Approvals and Multiple Selectable Workflows. And if you do have multiple selectable Workflows, at the top of the Customizing Problem Form pane, you will also see a Workflow selector field.

For example, if you use the Relyence FRACAS 8D template, there will be 9 forms. Each form represents one step in the 8D process, plus an additional Overview form for a high-level summary of the Problem. You may have as many or as few separate forms as you need to match your specific process. The advantage of using forms in this way allows you to control the process and make sure it is being completed in an organized, efficient way.
Whether you have a single Workflow or multiple Workflows, the Forms you can customize via the Customizing Problem Form pane will be defined as per the Workflow steps. For more details, see FRACAS Workflow and Approvals and Multiple Selectable Workflows.
To change the fields on a particular form, select the form you want to modify by clicking the appropriate form tab on the left. The list of fields on that form will appear. Use the toolbar buttons to make your changes.
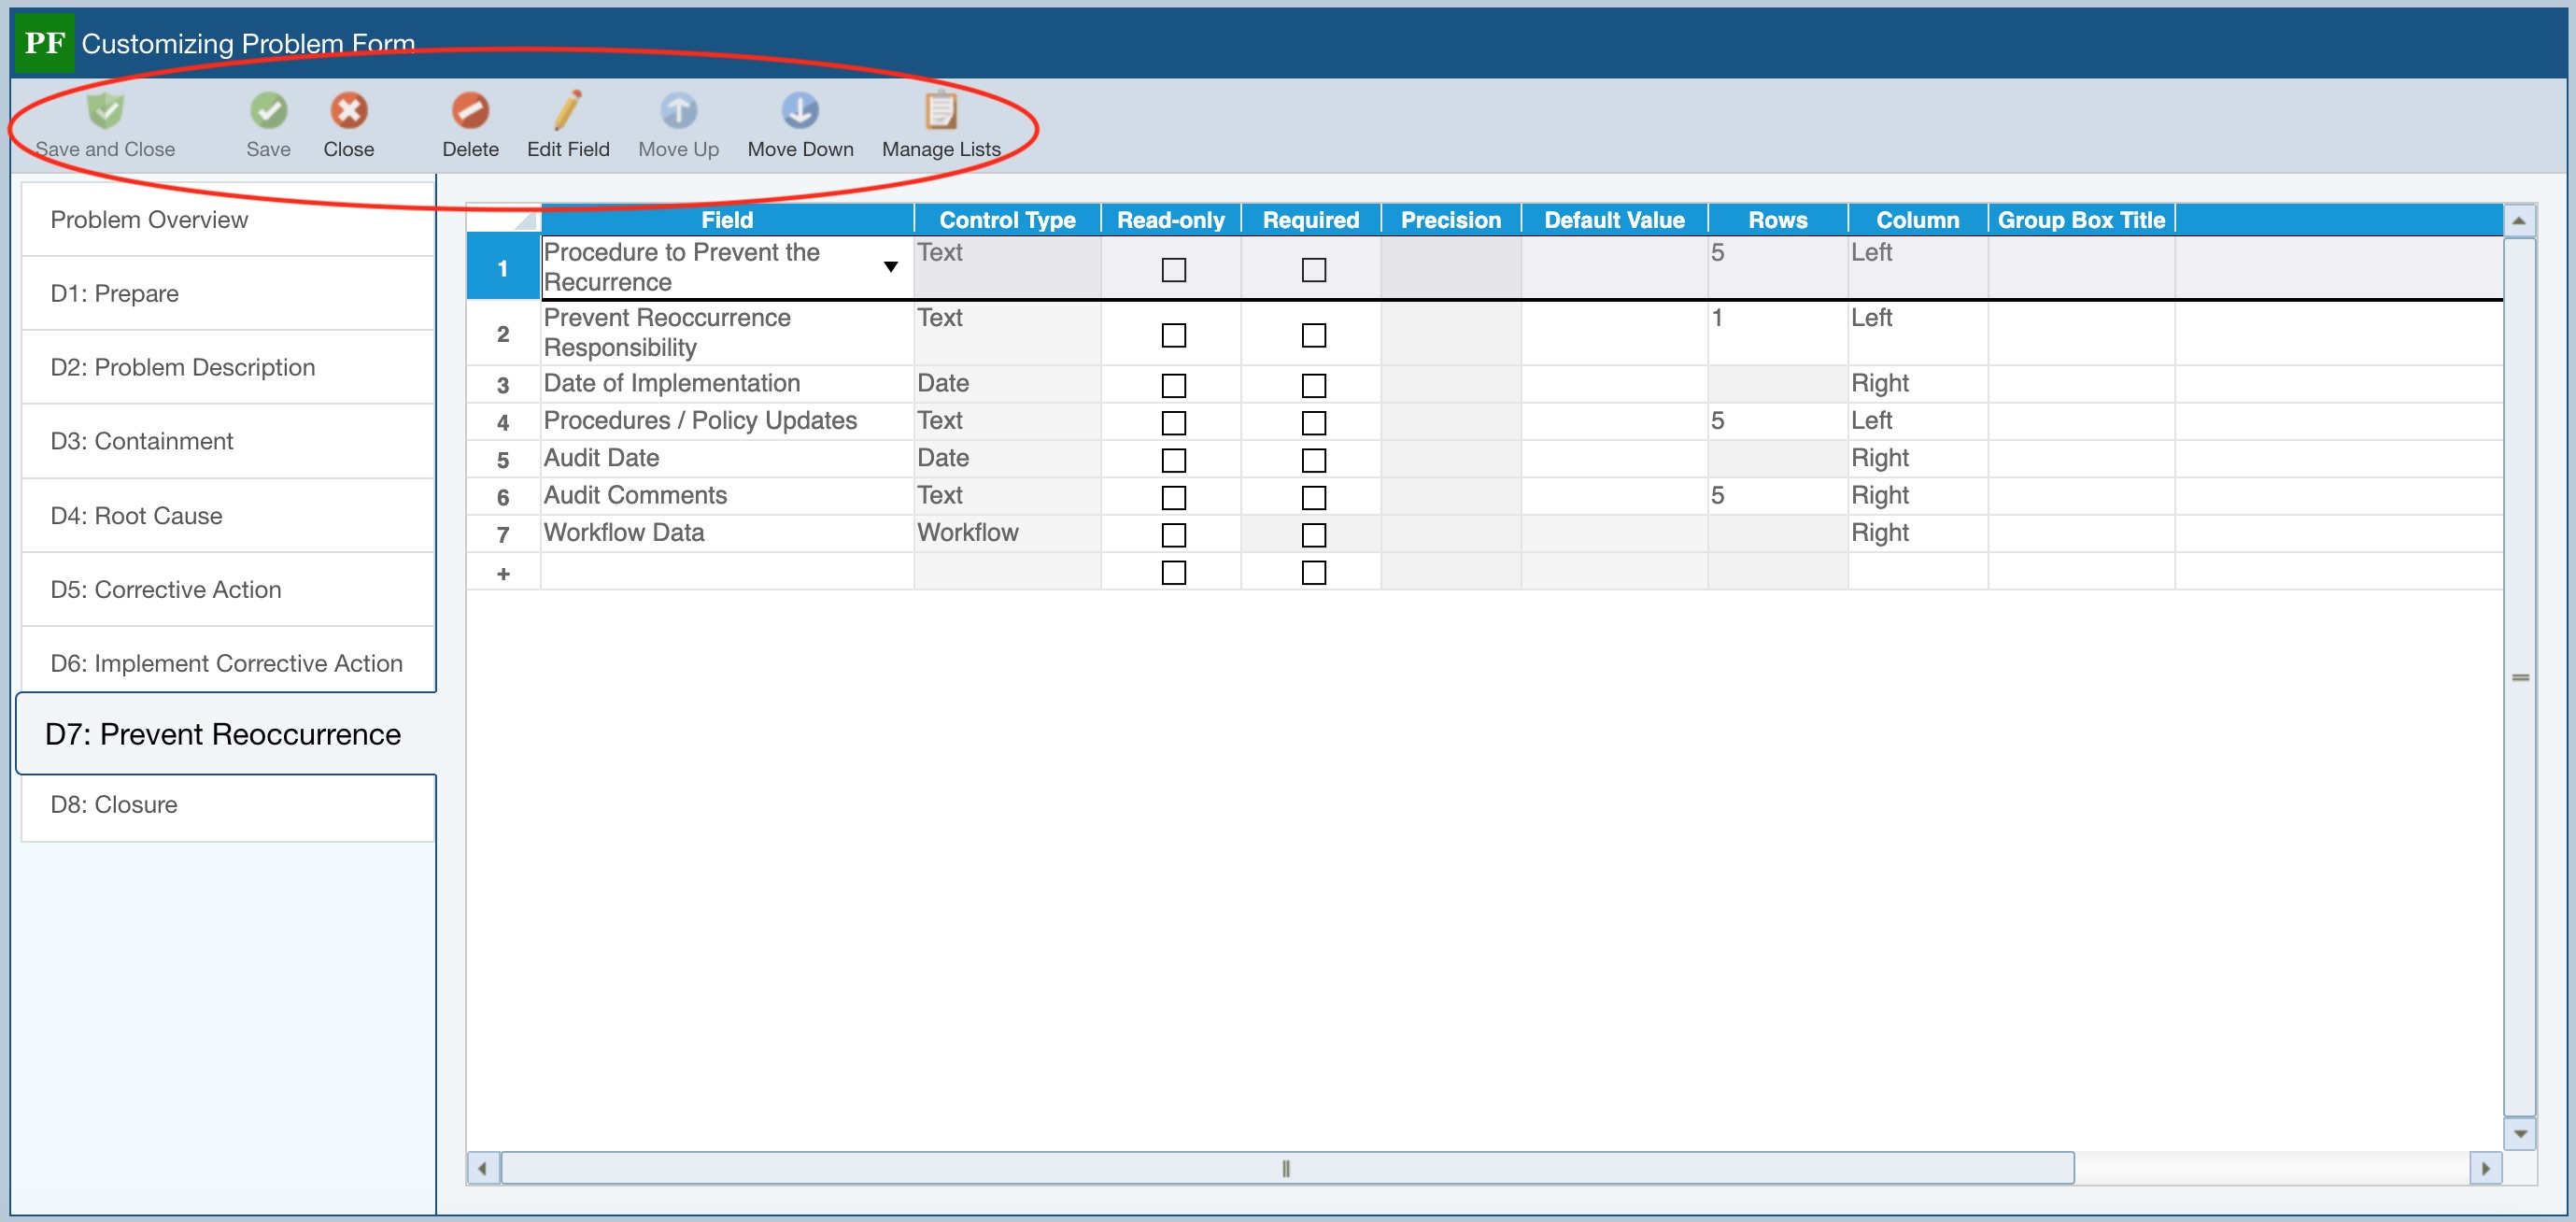
Use the toolbar buttons to make necessary changes:
- Delete - to remove selected fields from the Form
- Edit Field - to change the Field Name and/or Control Type for the selected field
- Move Up and Move Down - to change the position of the fields
- Manage Lists - to define Lists, list Choices and Dependent List relationships; for more details see Using the Manage Lists Dialog for Lists and Dependent Lists
- Save - to save changes and remain on the Customizing Problem Form pane
- Save and Close - to save changes and exit the Customizing Problem Form pane
Note that if you have multiple Workflows set up in the Analysis, the Customizing Problem Form pane will also show the Workflow selection field. Using the Workflow field, you can select the Workflow for which you want to customize the Forms.
Adding Fields to Custom Forms
To insert a new field, click on the empty row at the end of the field table and click the dropdown arrow and select from the list of available fields. If you do not see the field you want to add in the list, click <Add New Field>. The Edit Field dialog appears, and you can enter the name of your field and select its type.
Field: Displays the name of the field.
Control Type: For informational purposes only. Description of the field type.
Read-only: Select Read Only if you want this field to not be editable. This may be useful if you want a field to be entered on one form and appear on another for informational purposes, but you do not want to allow editing of the field on the second form.
Required: Select Required if data must be entered in the field. The Required setting is only enforced upon saving when an Incident or Problem changes Workflow State, Approval State, or is Closed. Required fields will display on your FRACAS forms with a red asterisk (*) next to the label.
Precision: You can enter the Precision, or number of digits after the decimal place, for Number fields.
Default Value: If desired, enter a value to automatically be entered for the field when a new Problem or Incident is entered and the applicable Workflow Step is active. If left blank, the Relyence default will be used.
Rows: Enter the number of Rows that appear for Text controls. For long textual entries, you may want more than one line.
Column: Use the Column setting to indicate if you want the field to appear in the Left or Right position on your form. When the form appears, the fields will appear in the order they appear in this list, in the position indicated by the Column setting. For example, if you set every field to Left, the fields will all appear in one column on the left side of your form. If you want fields to appear in both columns, alternate the use of Left and Right and the fields will appear in a two-column layout.
Group Box Title: The Group Box enables related fields together. All data fields with the same Group Box Title will appear in a box on the form with the specified title.
Tooltip: If you want a tooltip to appear on your Form, you can add the pop-up text to appear in the Tooltip field. The tooltip will appear when you hover the mouse over the field label on the Form.
Deleting Unused FRACAS Data Fields
When you have completed your FRACAS customization and have selected to Save your modifications, Relyence FRACAS will go through and analyze the status of your FRACAS data fields. If there are data fields you have removed from all your FRACAS Tables and Forms, but have data values entered in those fields, the Delete Fields? dialog appears.
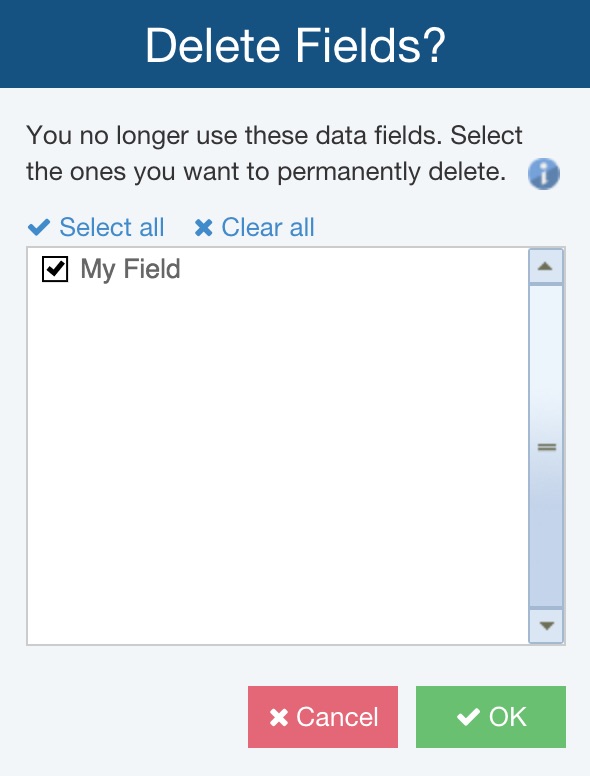
You can select the data fields you want to permanently delete. Select the checkbox next to the data fields you want to remove and click OK. If you want to keep data fields, make sure the checkbox next to the field name is cleared. If you click Cancel, no data fields will be deleted.
If you do not intend to use these data fields on your FRACAS Tables or Forms in the future, then you should permanently delete the fields. Deleting the fields also deletes the data you entered in those fields. If you think you may use the fields on your Tables or Forms again in the future and want the data in the fields to remain intact, then do not delete the fields.
Deleting unused fields allows these fields go back into the list of available FRACAS fields, and they can be reused on your Tables and Forms. If you do not delete them, then they are not available for use.