Getting Started with Relyence Reliability Prediction
If you would like to review a video overview of this Getting Started Guide, go to our online videos for Relyence Reliability Prediction.
1. Sign in to Relyence
To begin, make sure you are signed in to Relyence. For details on signing in, see Signing in and Signing out.
You must have a Relyence account to sign in to Relyence. If you do not yet have a Relyence account, you can register for one for free.
You may possibly see the Announcements dialog when first signing into Relyence. The Announcements automatically scroll, or you can review them using the previous and next arrow keys. For any Announcements you do not wish to see again, select the Don't show me this again checkbox. Once you have reviewed all the Announcements, click the 'x' (Close) button in the upper right corner of the Announcements dialog.
2. Open the Example Analysis
First, let's make sure Relyence Reliability Prediction is active.
After you have signed in, you may see a Welcome dialog. If a Welcome dialog does not appear, click Welcome to Relyence from the Help dropdown menu in the upper right of the Relyence header bar.
If you were previously working on an Analysis, you will see the Continue Where I Left Off option at the top of this dialog, otherwise it will not appear. If you are using a Trial version, the Show this page when Relyence opens option will not appear. This option is only available using a licensed version of Relyence.
Click the Reliability Prediction tab on the left to activate Relyence Reliability Prediction. Then click Open Example Analysis.
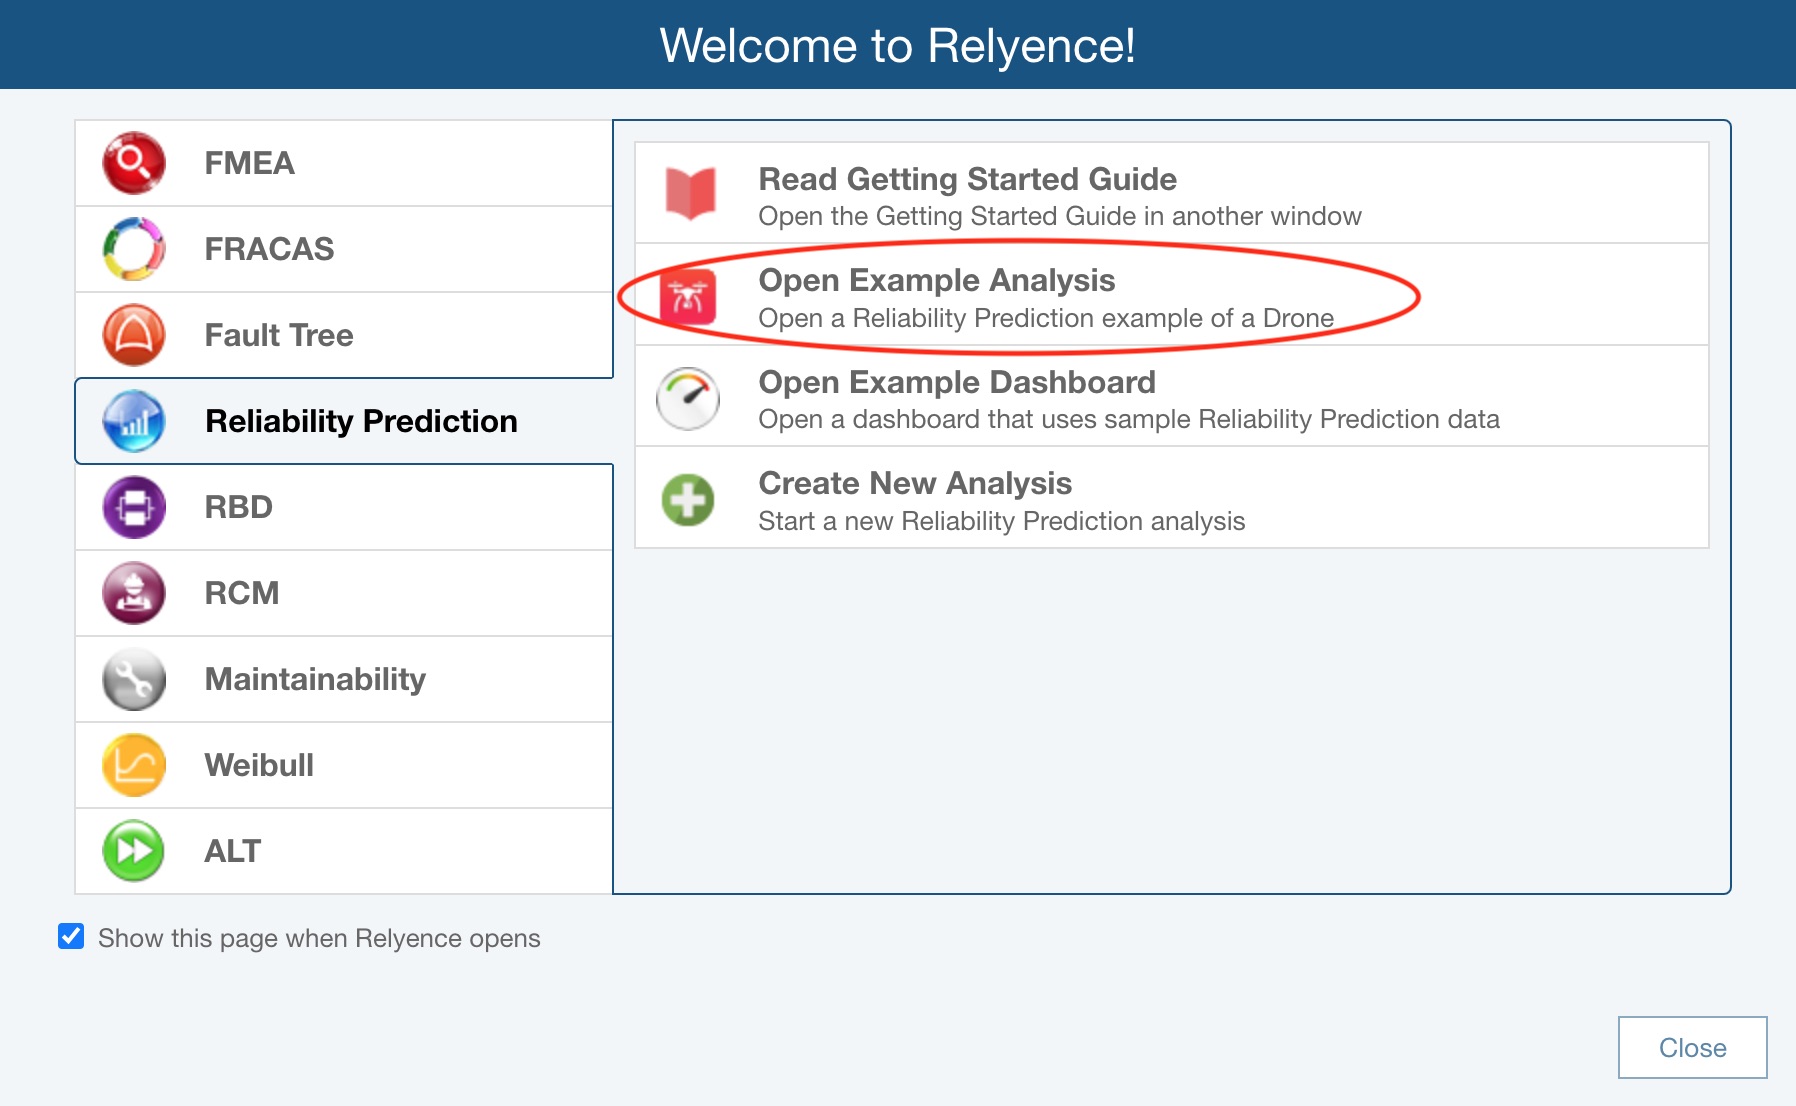
For this tutorial, we will use the Drone Example supplied with Relyence Reliability Prediction. The Drone Example is based on the MIL-HDBK-217 F Notice 2 reliability prediction standard. Relyence Reliability Prediction supports MIL-HDBK-217, as well as ANSI/VITA 51.1, Telcordia, 217Plus, Mechanical NSWC-11, and China's GJB/Z 299C.
When you open an Example, you will see the Revert Example pop up appear. You are free to make changes and save your changes to the Example Analyses. If you want to revert to the original Example at any time, click Revert Example. You will get a message asking if you are sure before your changes are discarded. Click Got it! to dismiss the pop up.
For this tutorial, we assume an unmodified original Example is being used. If you are not sure if you are using an unmodified version of the Example, click Revert Example from the Sidebar. You will be asked if you want to lose your changes and reopen the Example in its original version. Click Yes.
If you continue with a modified version, just be aware that screen shots or other functions may not operate exactly as described in this tutorial.
When complete, your Drone Example with its data will appear in the main window.
3. Review the Analysis Tree and Parts Table
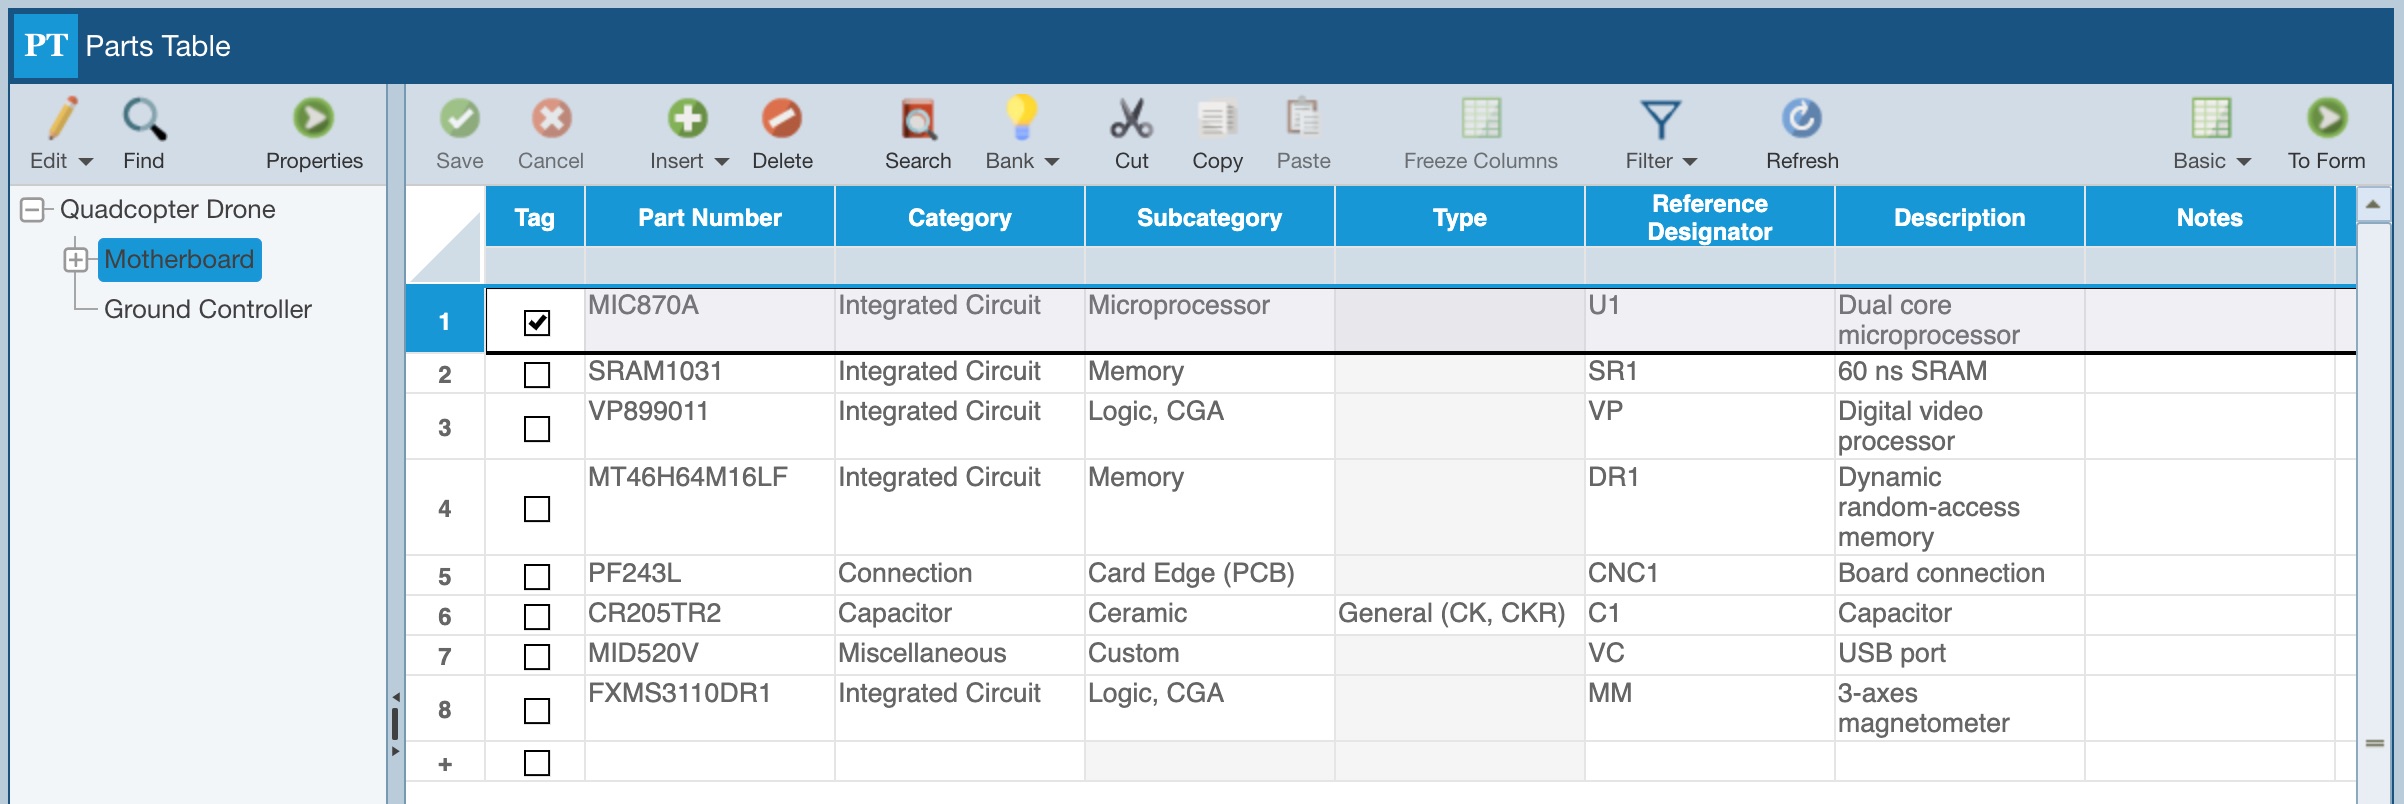
Click through the items in the Analysis Tree pane. As you select the different tree items, notice how the Parts Table updates to display the Parts associated with the selected tree item.
Scroll through the Parts Table to see some of the data associated with the Parts.
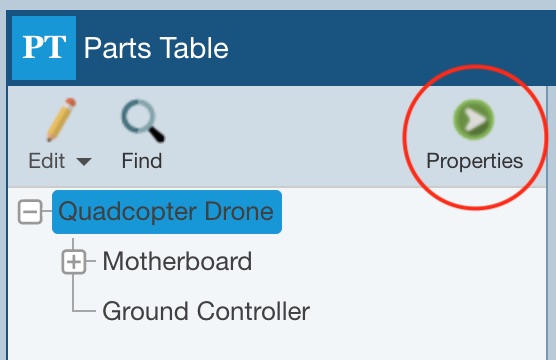
Click the Quadcopter Drone in the Analysis Tree to select it. To see the properties associated with the selected item, click the Properties button in the Analysis Tree toolbar.
The Analysis Tree Properties appears in the right pane.
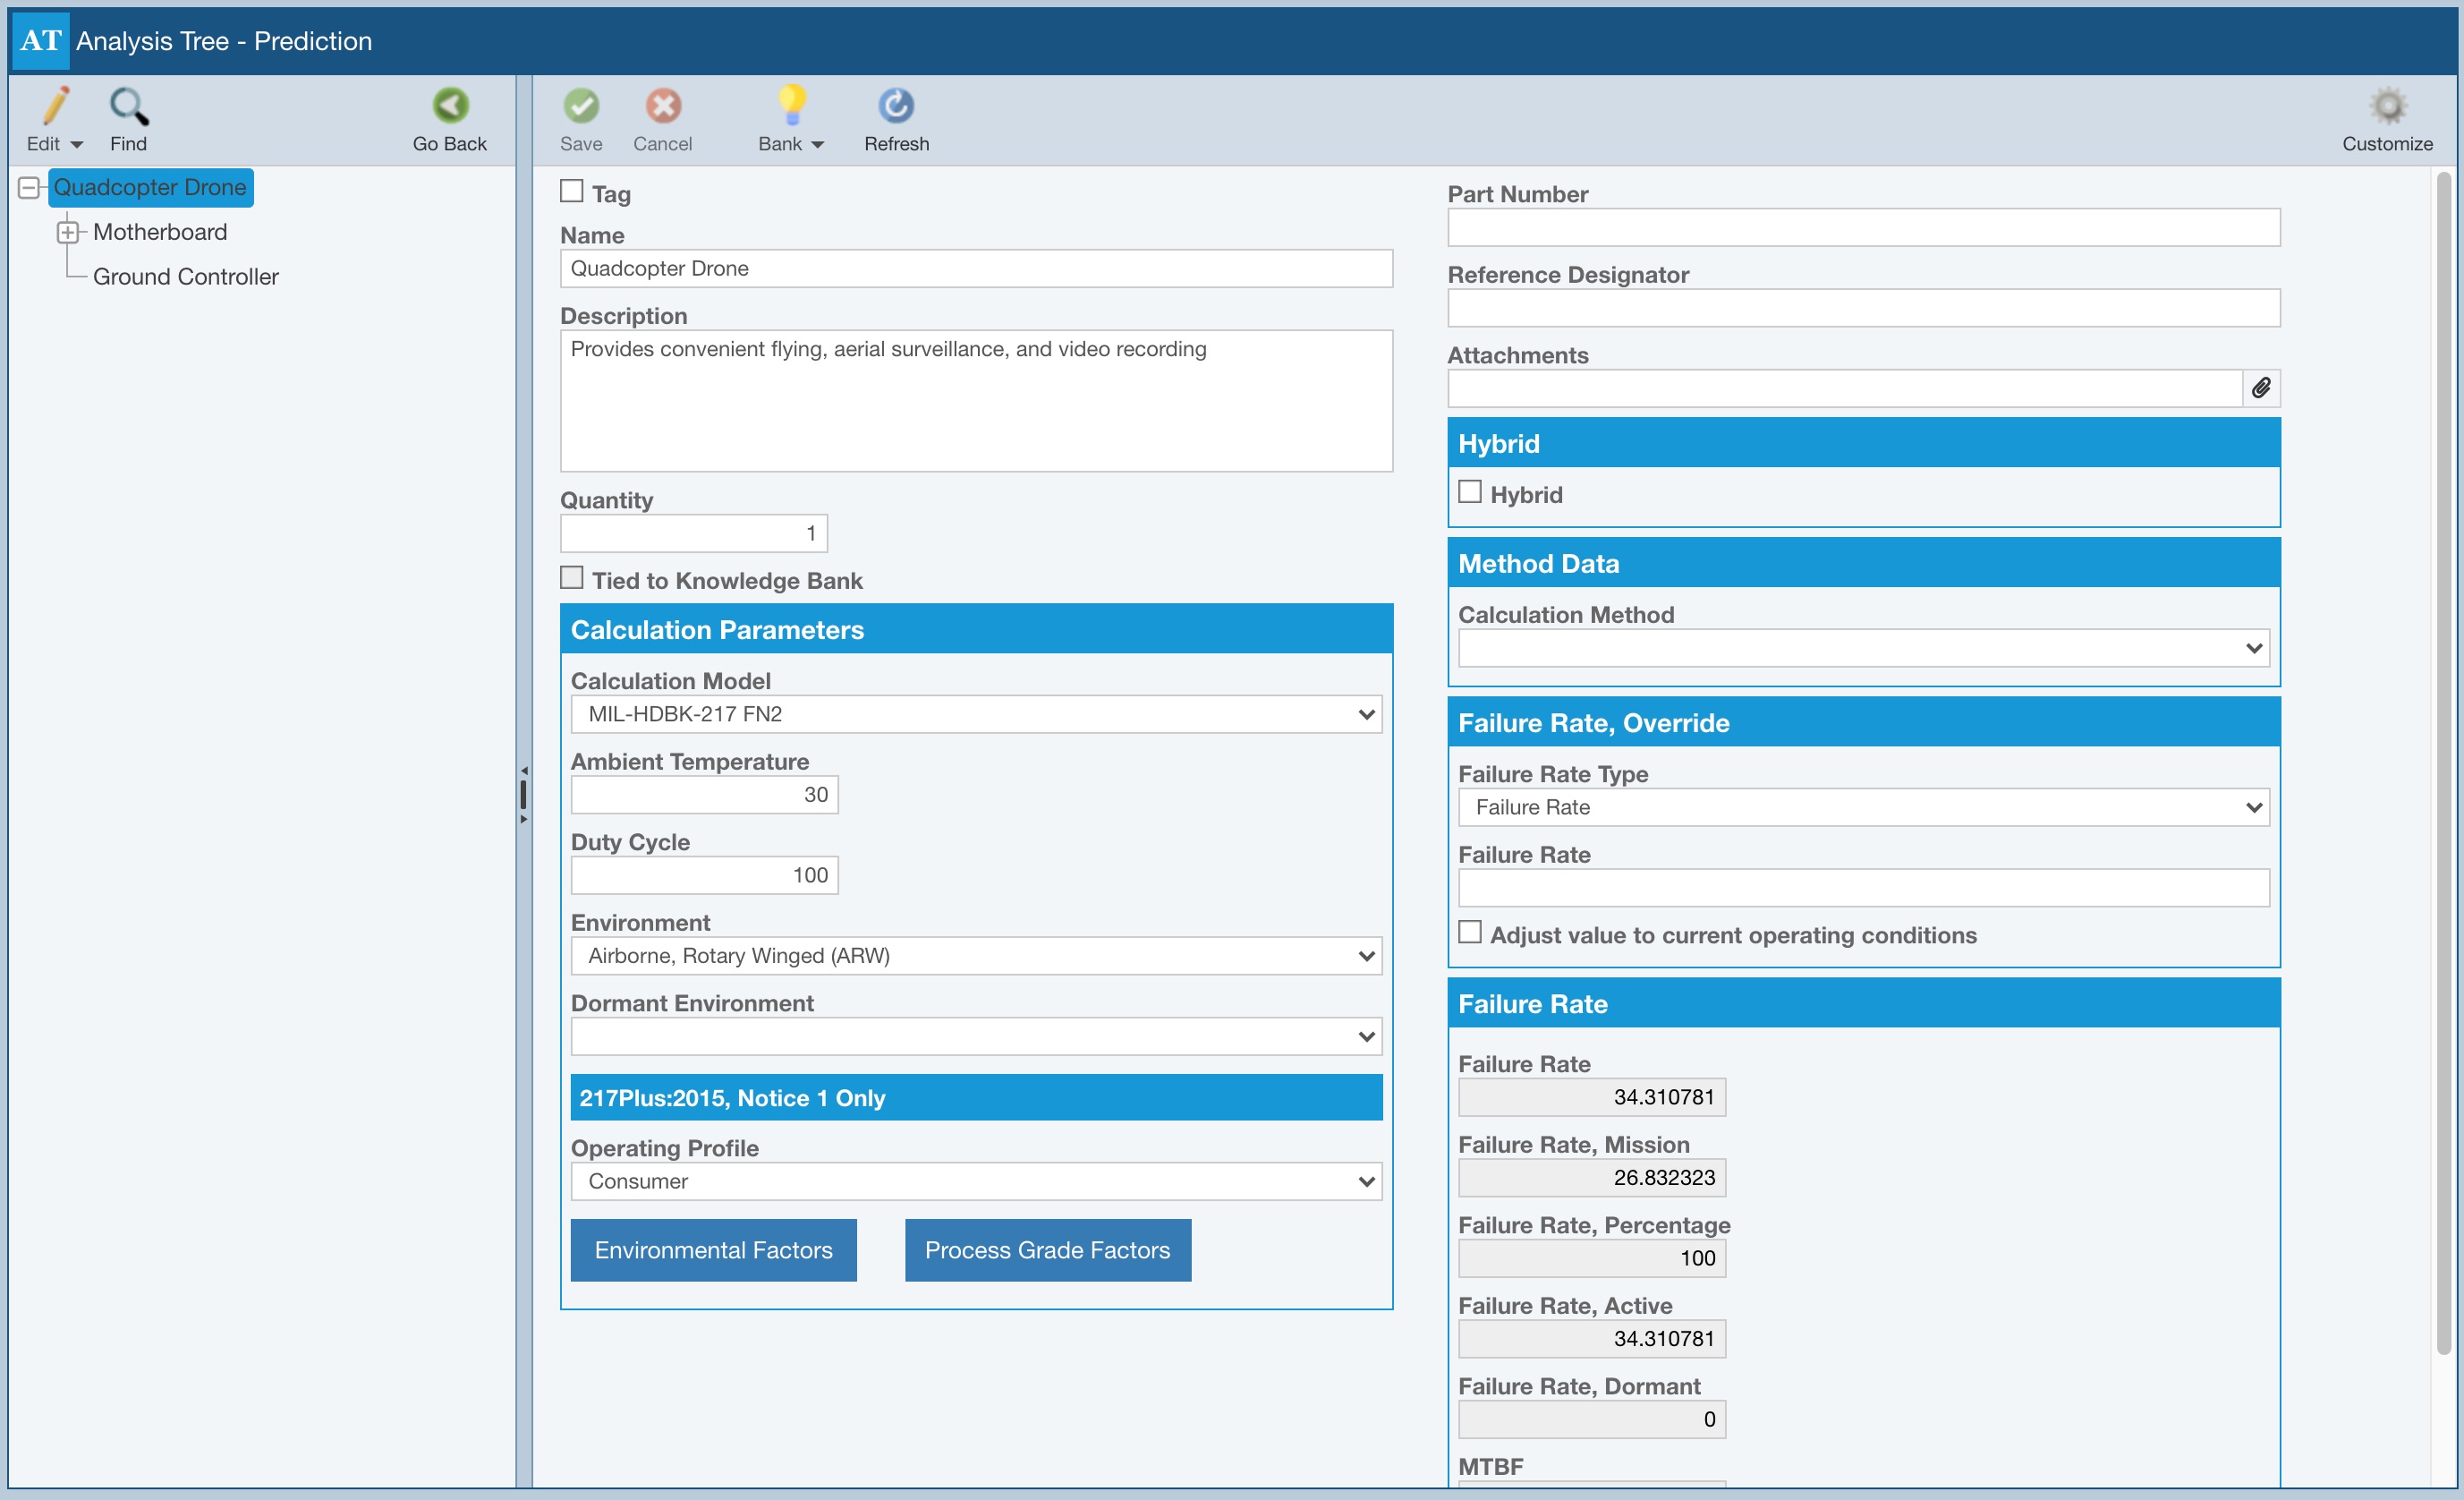
You can modify any data associated with the tree items on this form. This data can be included on your Reliability Prediction reports. You can click through various items in the Analysis Tree and see the properties data update to show you the selected item's information.
Click Go Back in the Analysis Tree toolbar to return to the Parts Table.
4. Review the Part Forms
All the parts in your Reliability Prediction have detailed data that is needed to perform a reliability prediction calculation. The data parameters required for each Part Category, Subcategory, and Type combination varies according to what is defined in the Reliability Prediction standard in use. Relyence automatically displays the appropriate part parameters needed.
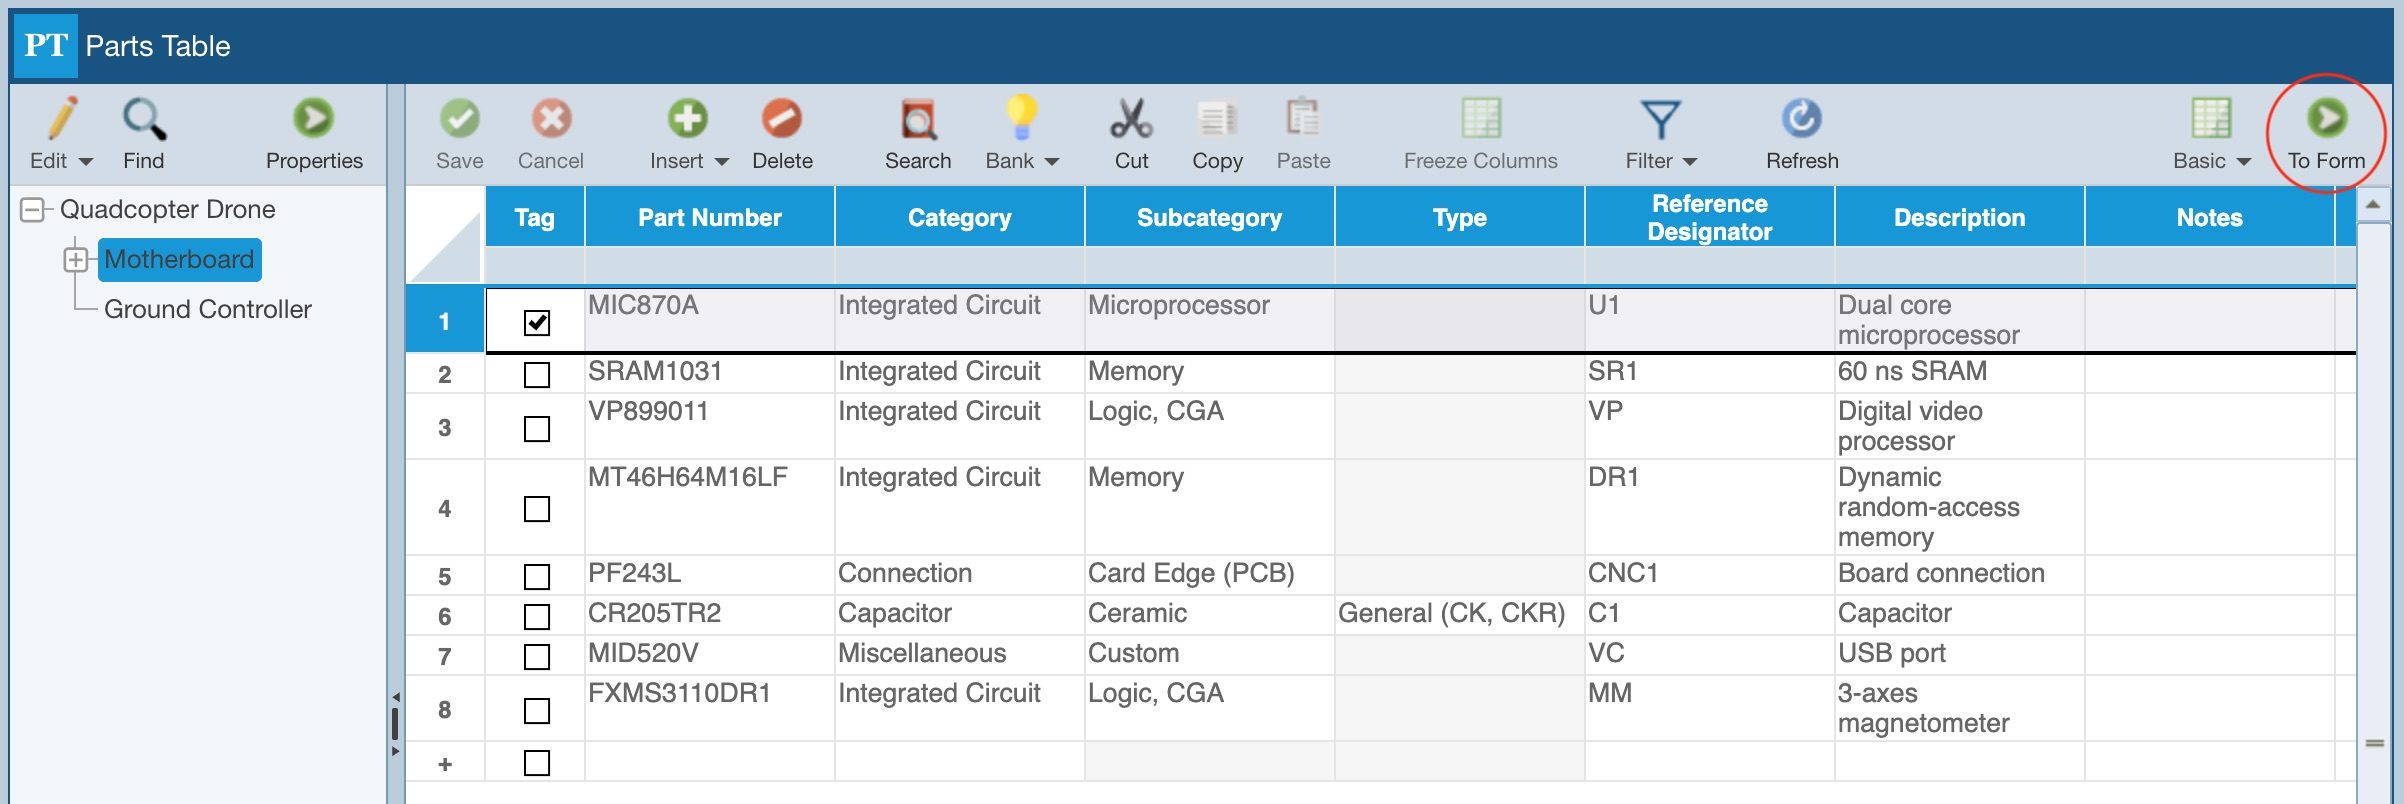
Click on Motherboard in the Analysis Tree. The Parts Table displays all the parts associated with the Motherboard. Click on the first part MIC870A in the Parts Table. Click the To Form button in the right side of the toolbar.
You will now see all the part data required for part MIC870A. You are not required to enter in all the data parameters. If the information is unknown, you can leave the data value blank and Relyence will automatically use average default values during calculations.
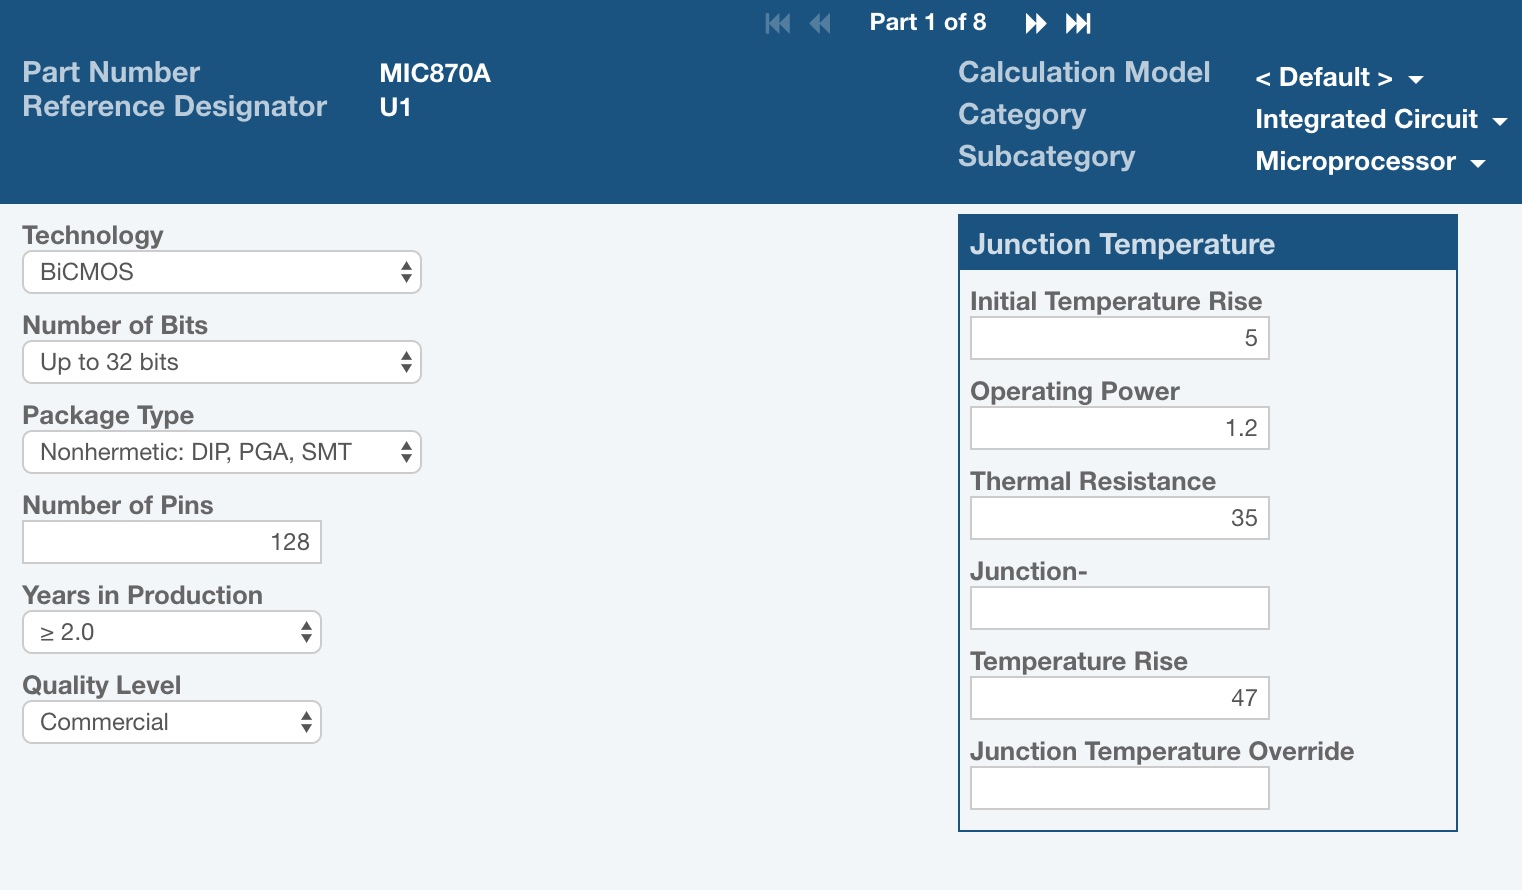
While on the Part Form, you can use the navigation buttons at the top to go through the parts associated with the selected Analysis Tree Item.
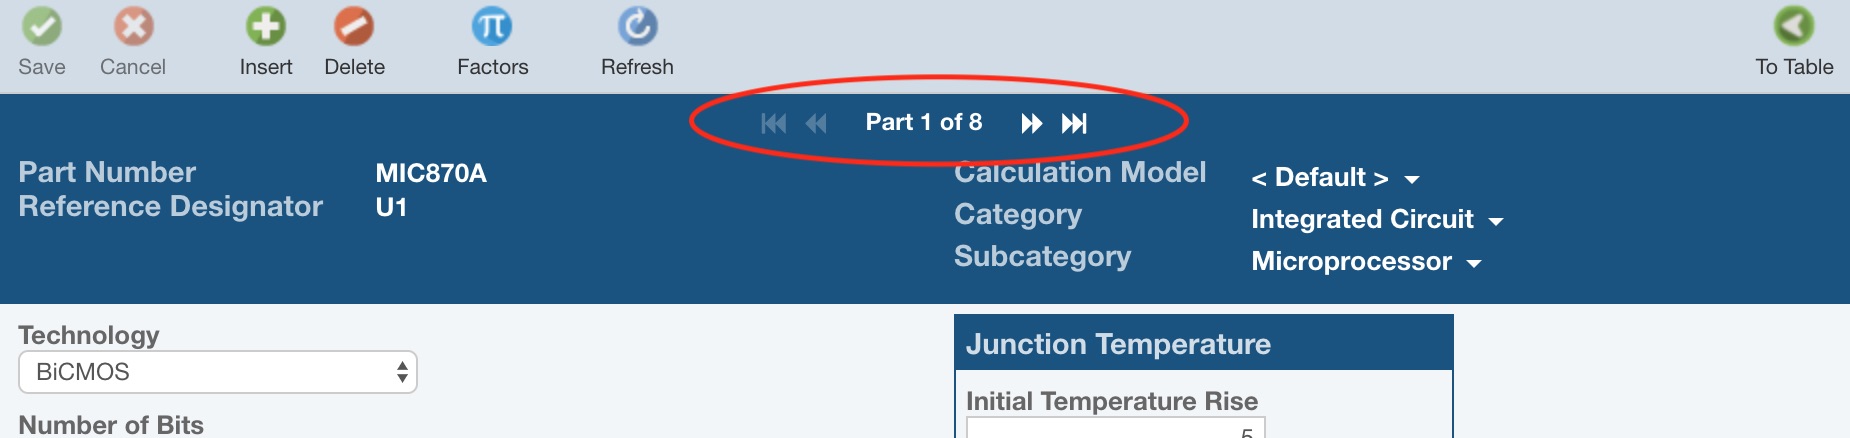
Go back to the Parts Table by clicking the To Table button on the right side of the toolbar.
5. Calculate
Once all your Analysis data has been entered, you perform a calculation to see the resulting failure rate of your system modeled in the Analysis. To do this, click Calculate from the Sidebar.
The Calculate Reliability Prediction dialog appears.
Note: If you are not using a Mission Profile such as the one included in the Drone Example, the Calculate Reliability Prediction dialog will not include a Mission Profile section.
For this example:
- Select all the calculation options in the Failure Metrics section, except Formulas (which allows custom formulas).
- Select all the calculation options in the Failure Rate Additional Metrics section.
- We do have a sample Mission Profile included in the Drone Example, so in the Mission Profile section, make sure the Calculate using a Mission Profile option is selected and leave the remaining defaults in that section.
Note: If you wish to learn more about using custom Formulas, see the Creating Your Own Reliability Prediction Formulas topic. For more details about Mission Profiles, see the Modeling Mission Profiles topic.
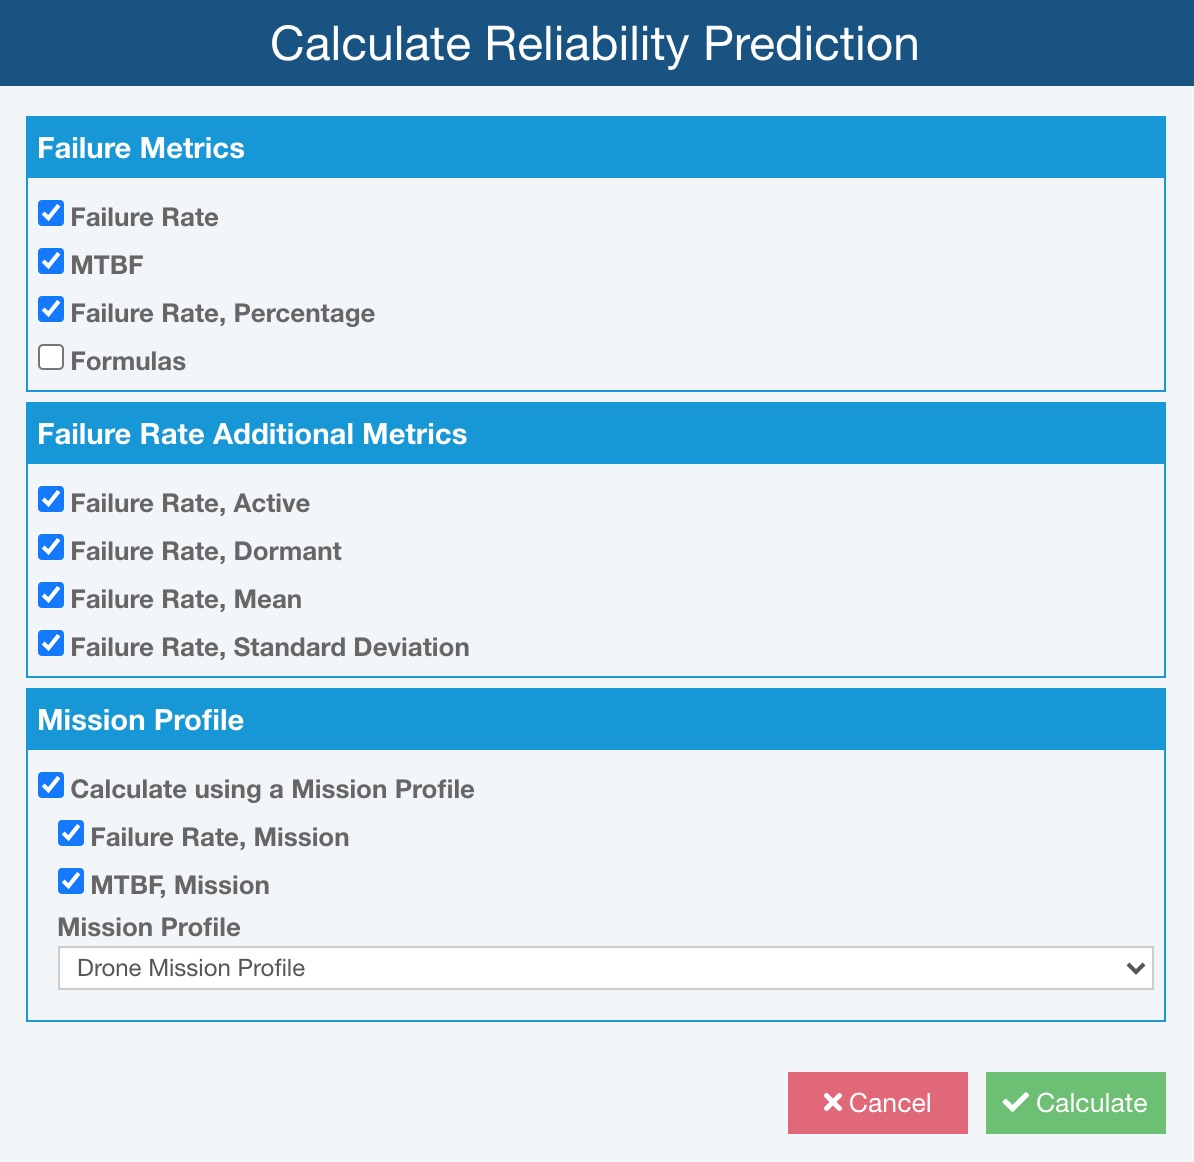
Click Calculate to perform the reliability prediction calculations.
Once complete, your calculation results will be displayed.

Click Close to close the Reliability Prediction Calculation Results dialog.
You can review the failure rates for the Parts on the Parts Table, and the failure rates of the Analysis Tree Items on the Properties forms.
6. Report
Once you have completed data entry and calculation, you may want to print out or save a report of your Analysis. To do this, click Report from the Sidebar.
The Report Options dialog appears.
- Enter "Example Drone Report" as the Report Title.
- Select Entire system from the Subsystems dropdown list.
- Make sure all checkboxes under Add to report are cleared.
- Leave the default selection of All images for Images.
- Make sure the Report header on first page only and Customize report header checkboxes are cleared.
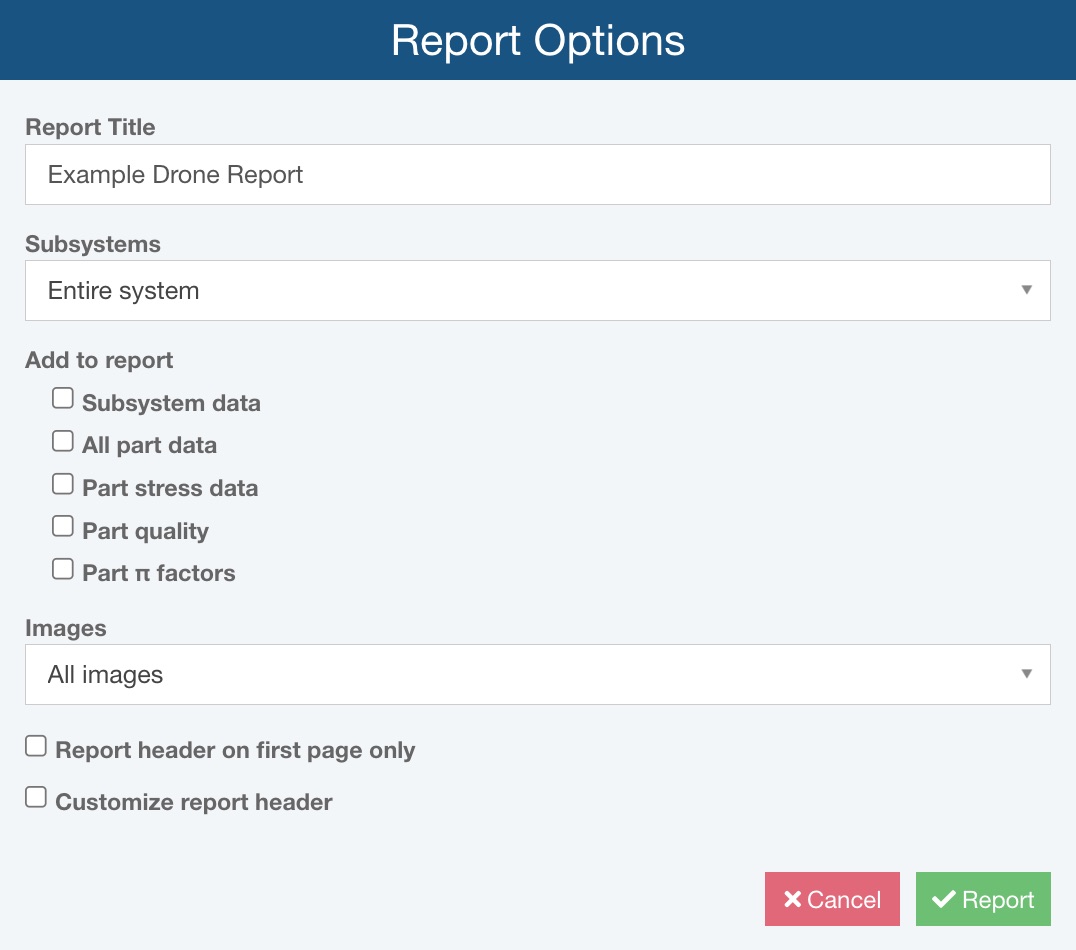
Click Report to generate the report.
The report preview appears in a new browser tab.
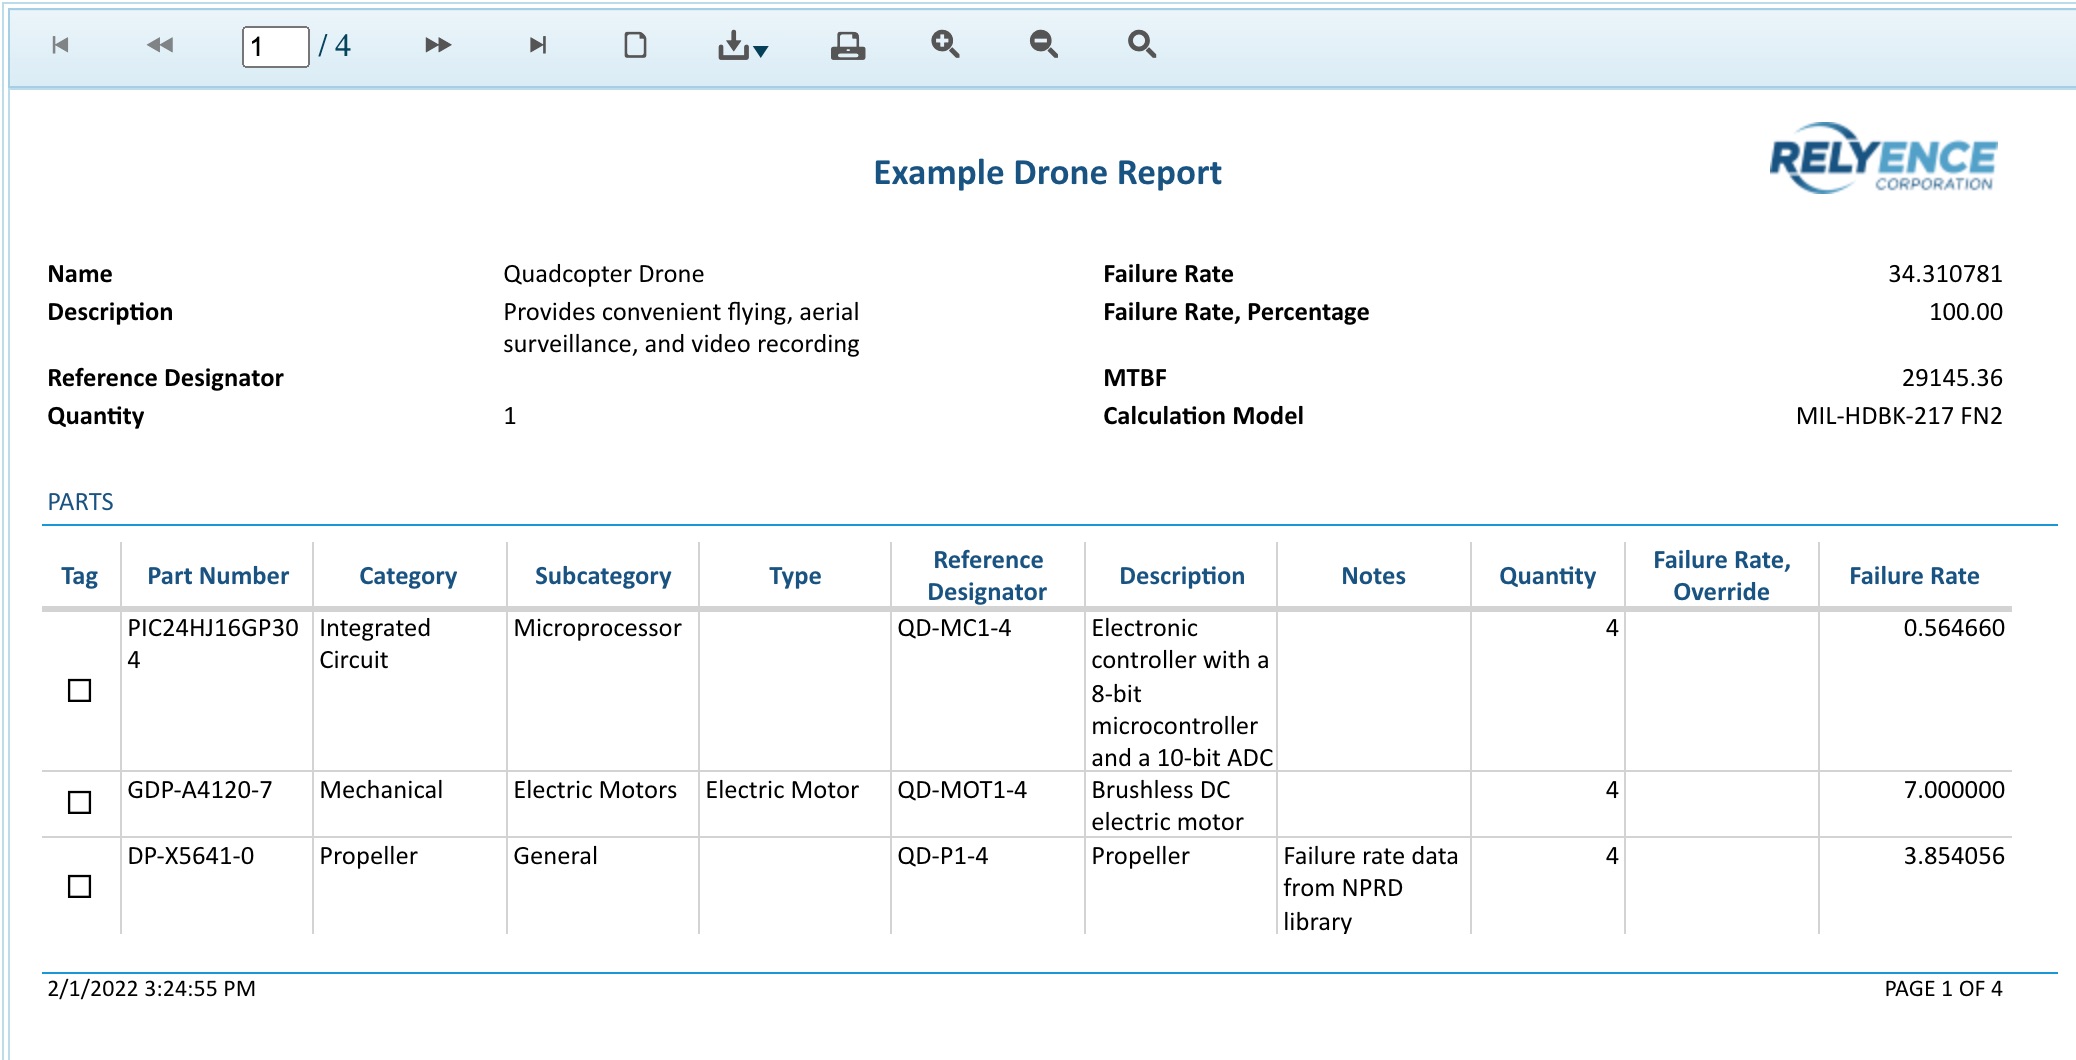
You can print the report, or save it in a PDF, Excel, PowerPoint, TIFF, or Word format.
Close the Report browser tab when you are done viewing the report.
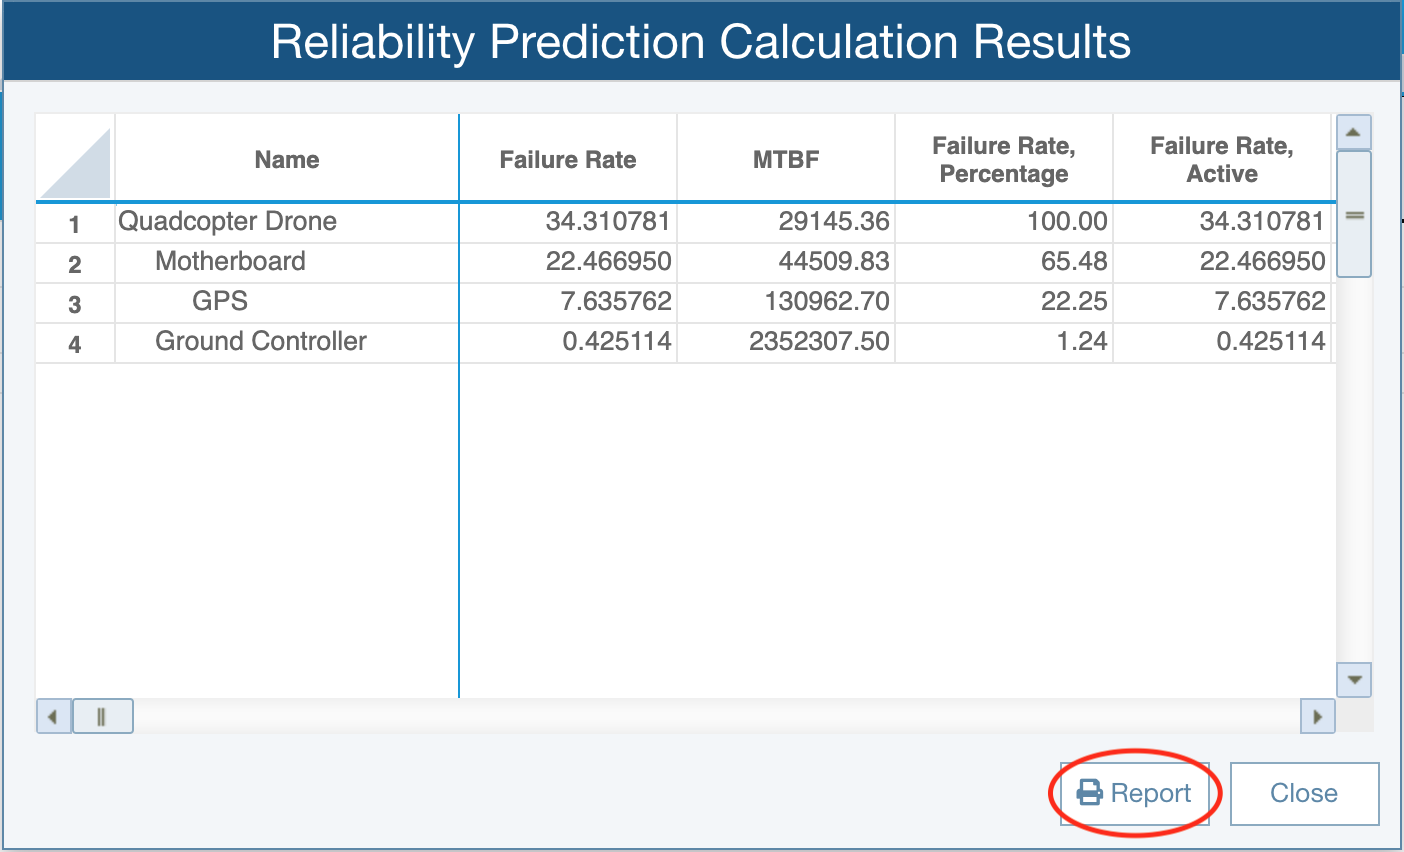
You can also generate a report of your calculation results. Select View Results from the Sidebar menu to bring up the Reliability Prediction Calculation Results dialog. Click the Report button.
The Report Options dialog appears.
.jpg)
Click Report to generate a Reliability Prediction results report. The report appears in the new browser tab.
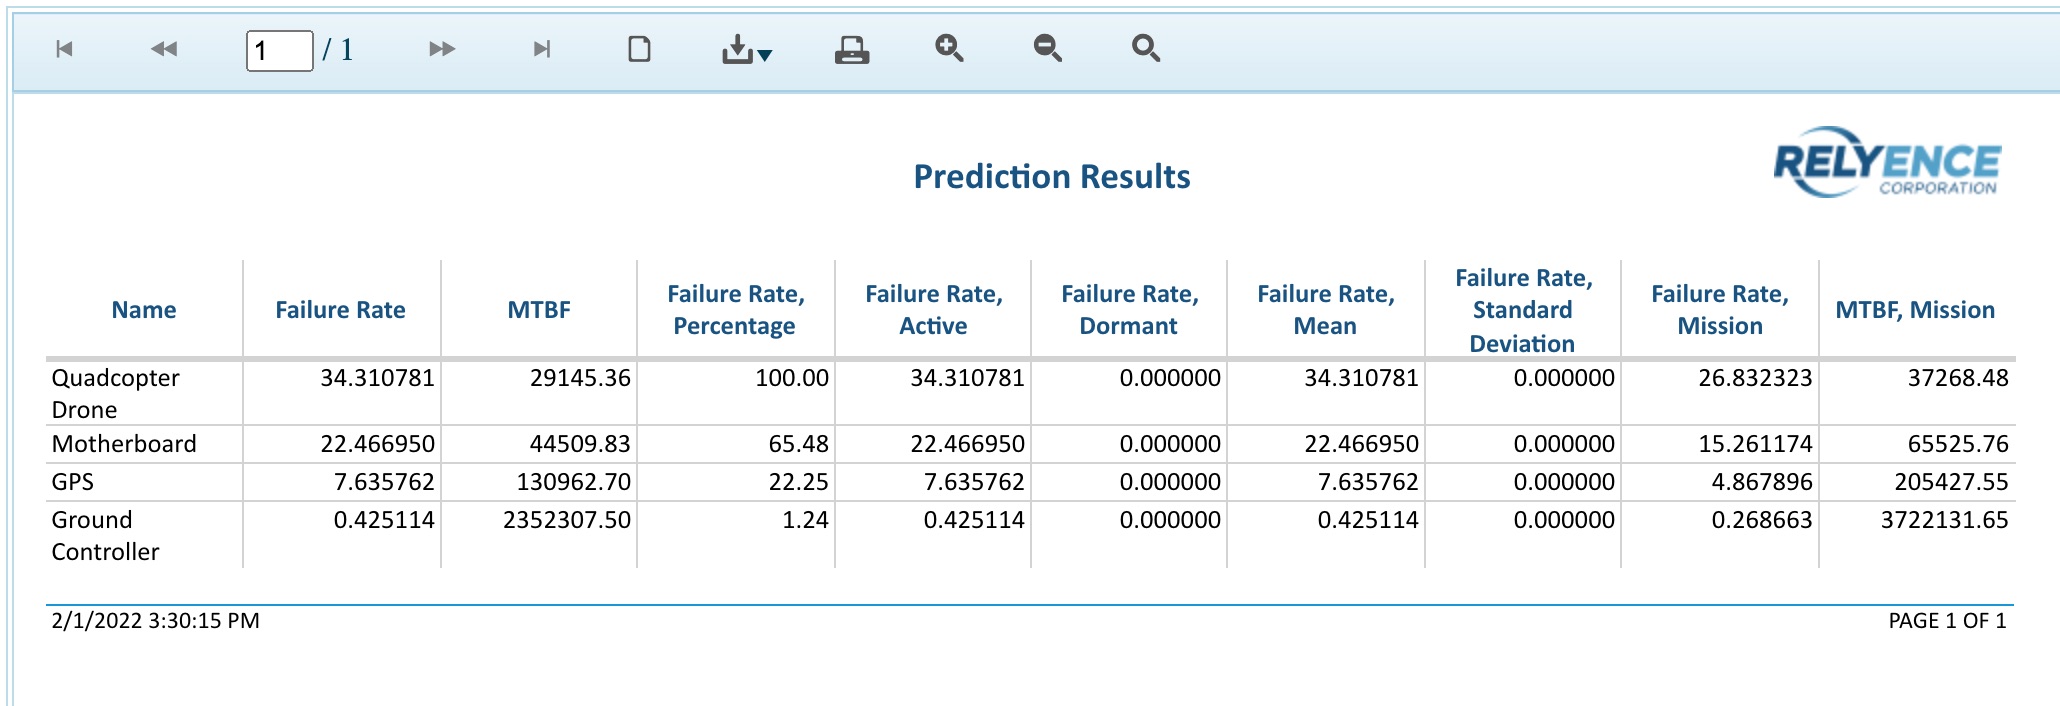
Close the Report browser tab when you are done viewing the report.
Click Close to close the Reliability Prediction Calculation Results dialog.
7. Add an item to the Analysis Tree
In the Analysis Tree pane, select Quadcopter Drone.
We are now going to add an additional subsystem to our Quadcopter Drone.
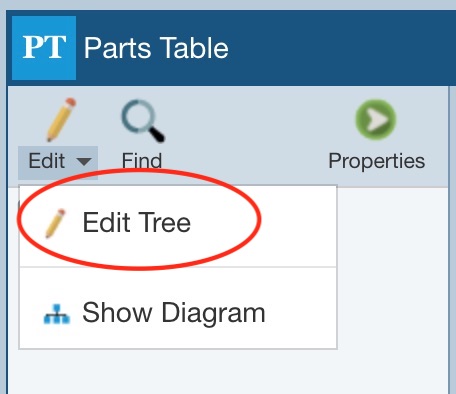
In the toolbar of the Analysis Tree pane, click Edit>Edit Tree. Note that because Edit Tree is the first item in the Edit submenu, you could also just click the Edit icon and it will perform the Edit Tree action.
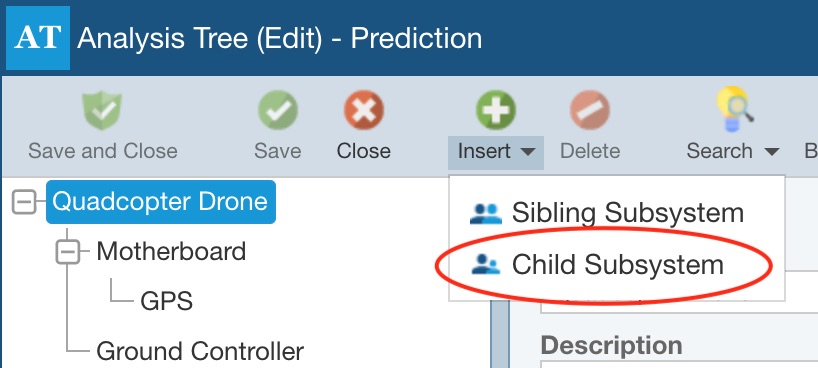
You will go to Edit Mode for the Analysis Tree. In the toolbar, click the dropdown arrow on the Insert button and click Child Subsystem.
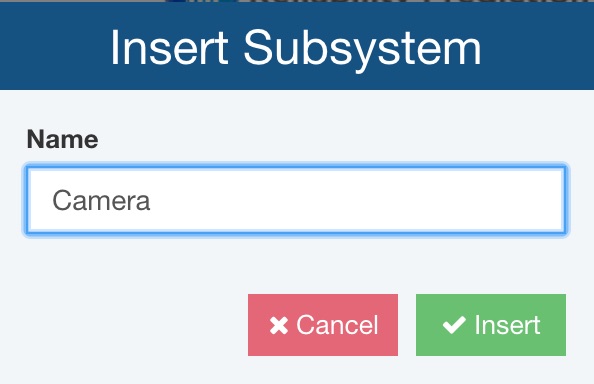
The Insert Subsystem dialog appears. Enter "Camera" for the Name of the new subsystem. Click Insert to insert the Camera as a new subsystem of the Quadcopter Drone.
You can insert child and sibling subsystems as needed to build your Analysis Tree to reflect the hierarchical structure of your product or system.
Click Save and Close to save the changes made to the Analysis Tree and return to the Parts Table.
8. Add new Parts
Now we're ready to add some parts to the Camera Subsystem. If needed, click on the newly inserted Camera in the Analysis Tree to select it.
 In the Parts Table, notice three important columns: Category, Subcategory, and Type. The Category, Subcategory, and Type fields are used together to define the particular component you are using. The Type field is not always required and will be enabled or disabled automatically as needed. The Category, Subcategory, and Type (if required) fields must be entered in order to calculate a failure rate. If one or more of those required fields is not entered, Relyence will display a zero failure rate when calculating.
There are several ways to enter component data in Relyence Reliability Prediction: using the Parts Libraries, using Intelligent Part Mapping, entering Parts in the Parts Table directly, or importing. We will review several of the methods you can use for data entry.
Adding Parts using the Parts Libraries
Click in the first row in the column marked Part Number in the Parts Table.
The Part Number field is not required. However, Relyence has a built-in parts database of commonly used components to aid your data entry. As you enter a Part Number, Relyence Reliability Prediction will automatically search the Parts Library to see if there is a match. If the Part Number is found, the associated Part data will be retrieved and entered for you. You can turn this Relyence Parts Library searching off; refer to the Reliability Prediction Properties topic for details. You can also supplement the Relyence Parts Library with your own parts library if you want; refer to the Managing Your Own Reliability Prediction Parts Library topic for details.
Start typing "74" in the Part Number cell. You will see a list of matching Part Numbers drop down as you are typing.
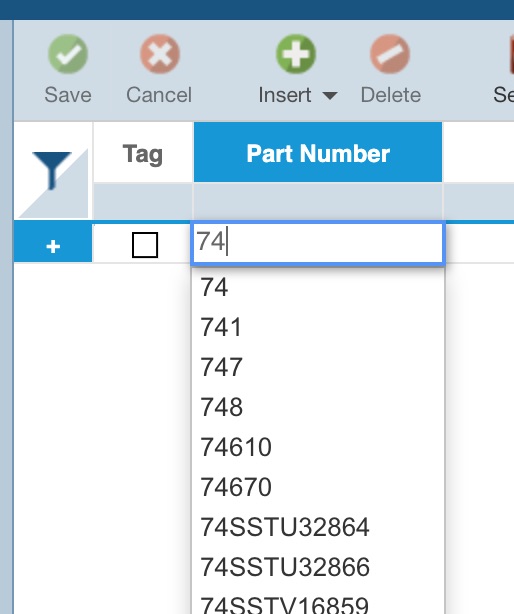
Continue by adding "LS" after the 74. You will see the list show Part Numbers that begin with 74LS. As you type more characters, the list is continually filtered to match your entry.
Select Part Number 74LS00 from the list, or type in the Part Number, and press Tab. A small green pop-up message will temporarily appear in the lower right of your display indicating that the Part Number was found in the Relyence Library. During data entry as you enter in Part Numbers, the pop-up message will appear if the Part Number has been located in any of the active Part Libraries.

Notice that the information retrieved and filled in for the newly entered 74LS00 part. For Part Numbers found in the Libraries, the data for the part will be automatically filled in.
You can also use the Search Parts function to find and locate parts in the Relyence Parts Library, your own Parts Library, and the NPRD and EPRD Libraries. The Search Parts function allows you search the libraries based on criteria you enter, such as for Part Numbers that start with "74LS" and view the resulting parts and their detailed part data. For more information on using the Search Parts feature, see the Searching Parts Libraries topic. For more information on inserting NPRD and EPRD components, see the Entering NPRD and EPRD Parts topic.
Notice that small red marks appear in the corners of cells in the Parts Table. This indicates that new data has been entered and has not yet been saved. Any time you see red marks like this, you will know that unsaved changes are pending.
Click the To Form button in the right side of the toolbar to go to the form for this new part.

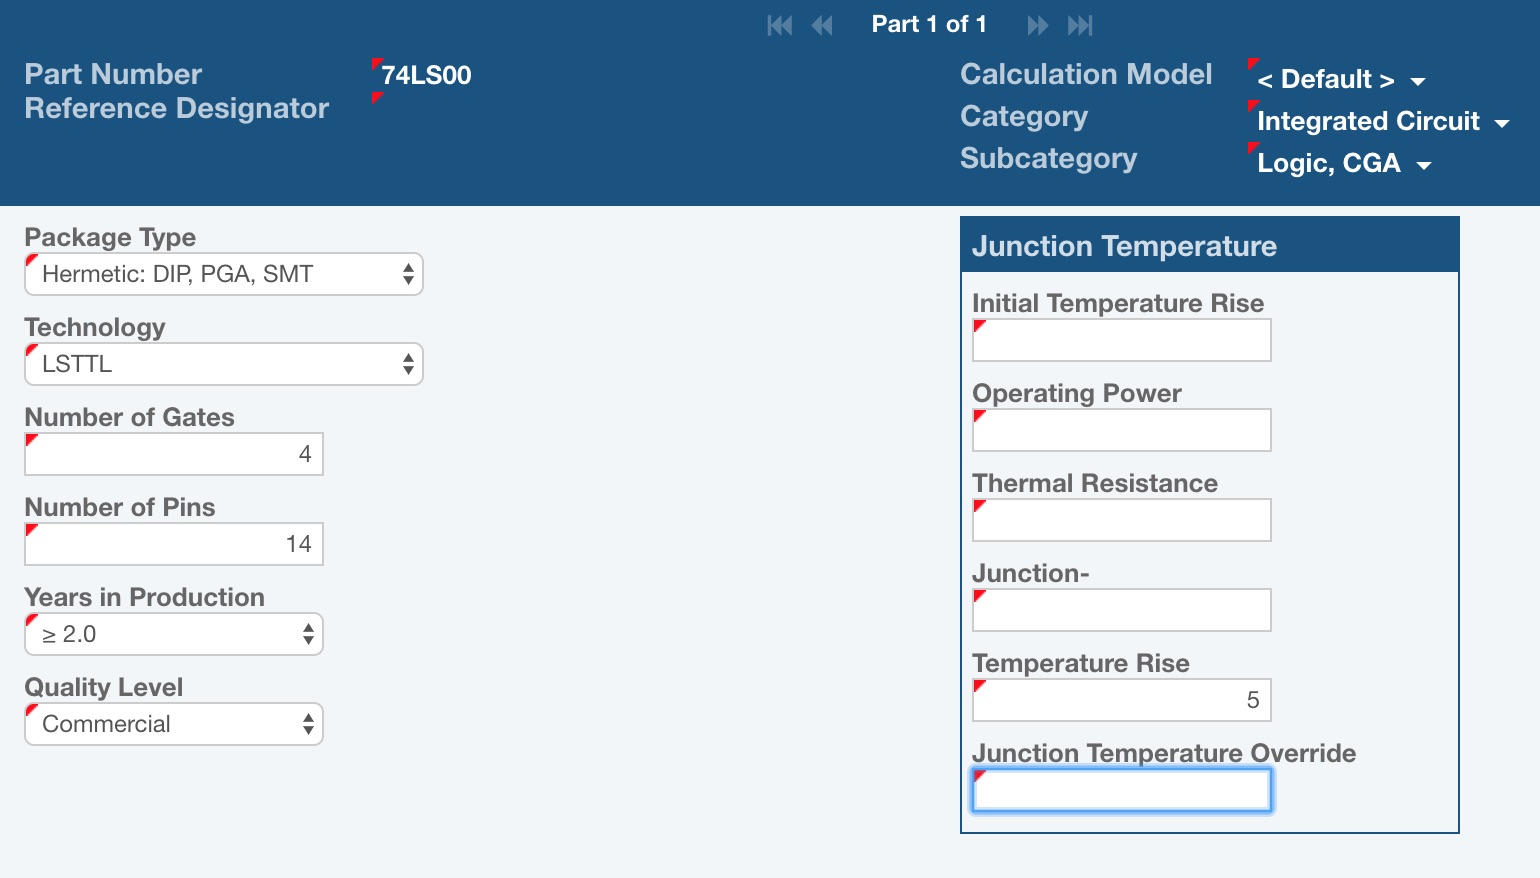
Notice that most of the part data has been automatically entered. Complete the data by entering "Hermetic: DIP, PGA, SMT" for Package Type and "5" for Temperature Rise. If you do not know the information requested, you can leave the data field blank. Relyence will automatically use average default values during calculations. As more data becomes available, you can return to the form and add it in. The more data parameters you enter, the more accurate your predictions will be.
Click the Save button in the toolbar to save your changes. You will notice the red marks disappear to designate that your changes have been saved.
Calculating Part Pi Factors
Reliability Prediction standards compute failure rates based on Pi Factors. Pi Factors are determined based on the component's operating and rated parameters. You can view the Pi Factors for a Part on the Part Form. This may be helpful if you want to modify part parameters and view the effects on the Pi Factors, and subsequently, the Failure Rate. Note that Part Pi Factors can also be included on your Reliability Prediction reports if you want.
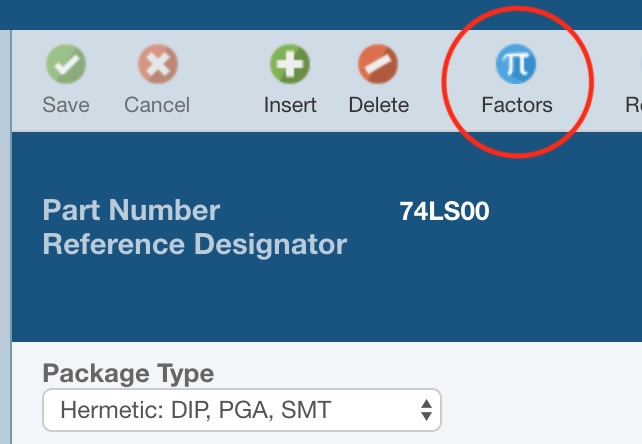
Click Factors in the toolbar.
The Pi Factors dialog showing the pi factors for the newly added part is displayed.
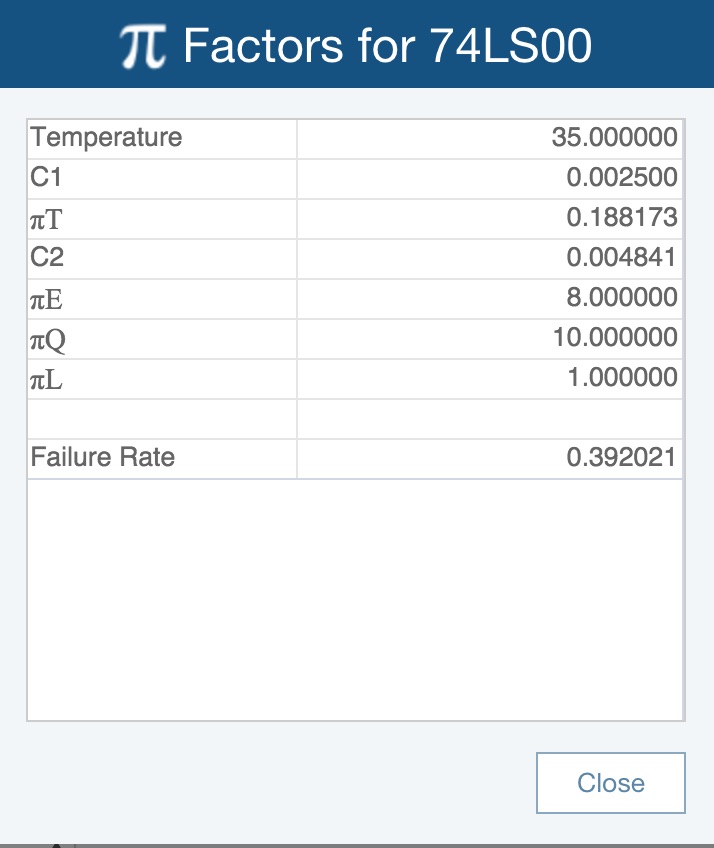
When you have completed reviewing, click Close.
Note that you do not have to save your data modifications in order to see the current pi factors. The Pi Factors dialog will show you the pi factors associated with the data as it appears on your display. This allows you to make edits to your data parameters while on the Parts Form and see the resulting effect on the Pi Factors.
Click the To Table button to return to the Parts Table.
Adding Parts using Intelligent Part MappingTM
You can also enter Parts using Relyence's unique Intelligent Part Mapping feature. Intelligent Part Mapping is optional, but can be very helpful in decoding component information based on Description.
In the Parts Table, click in the Description field in the second row under the 74LS00 Part. Type "Cap Cer 10uF 50V" and press the Tab key.

A small green pop-up message will temporarily appear to indicate that part data has been entered using Intelligent Mapping. Notice that the Category, Subcategory, and Type have been automatically filled in. Click the To Form button and notice that some of the part data has been automatically filled in as well.

Click To Table to return to the Parts Table.
Adding Parts directly in the Parts Table
You can also add Parts by selecting the Category, Subcategory, and Type, and entering as much or as little part data as you have. As your design matures, you can continually update the part data information as operating and rated data parameters become established.
In the blank row at the bottom of the Parts Table, click the Category dropdown list to view the list of available Part Categories.
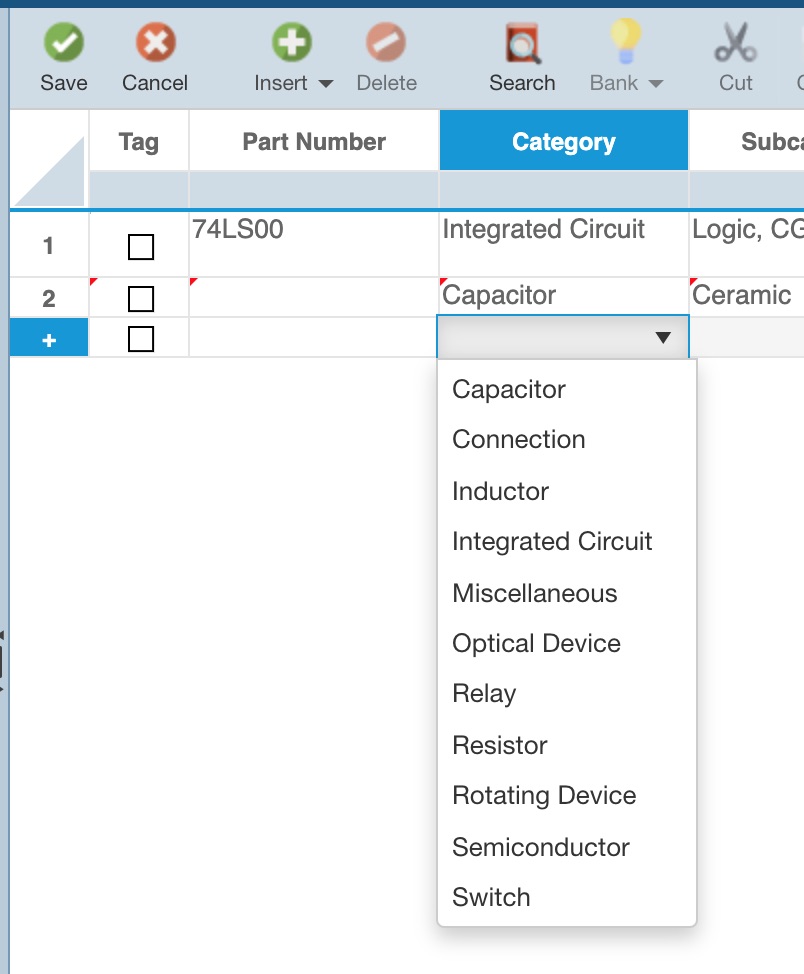
Select "Resistor" from the Category list. Select "Fixed" from the Subcategory list, and "WW, Accurate (RB, RBR)" as the Type.
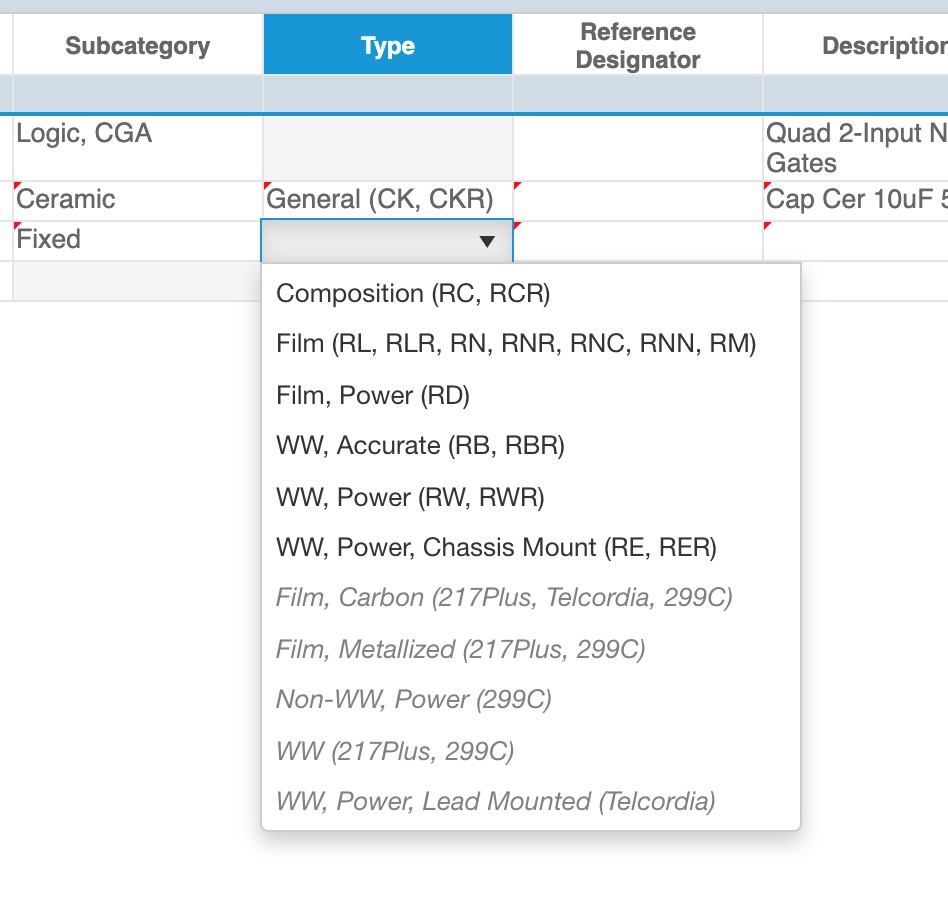
Notice that some of the Fixed Resistor Types are italicized. In parentheses for these Types are the corresponding Reliability Prediction standards which support those specific devices. You can use multiple Reliability Prediction standards in Relyence if you would like. This enables you to utilize component models for failure rate computations across a broad range of devices. In Relyence, you can easily change calculation models on a per Part basis, supporting flexible mixed-model reliability predictions.
Adding Parts by importing
You can also import Parts directly into Relyence Reliability Prediction. For example, if you have your component list, or BOM (Bill of Materials), in an Excel spreadsheet, you can import this list. For details on importing, see Importing and Exporting Reliability Prediction Data.
Completing Parts entry
Once you have completed entering your Parts, click Save to save all your changes.
If you would like to recalculate to see updated results and view a report of your updated Analysis, feel free to calculate and report as you did in the previous steps.
9. The Analysis Tree and Analysis Diagram
You can use the Analysis Diagram feature of Relyence Reliability Prediction to visually depict your product or system. The Analysis Tree pane toggles between the Analysis Tree view and the Analysis Diagram view using the Edit>Show Diagram and Edit>Show Tree commands on the Analysis Tree pane toolbar.
For an overview of using the Analysis Diagram, go to Getting Started with Relyence Analysis Diagram.
10. Moving on
Congratulations! You have successfully completed the Relyence Reliability Prediction Getting Started tutorial and are ready to move on!
You are welcome to continue using the Drone Example to try out some other features and functions or start with a new Analysis. To create a new Analysis, click on Drone Example on the Sidebar menu, and then click Create New... on the submenu, or select Welcome to Relyence from the Help dropdown menu and click Create New Analysis. Remember that you can also click Revert Example to start over with an original Example.
Please note that there are limitations in the Trial version in the amount of data that can be entered. You will be notified when you have reached these limits.
There are additional features not covered in the Getting Started tutorial, such as Parts Libraries searching capabilities, using the NPRD/EPRD databases, modeling Mission Profiles, customizing your Views, and much more. For more information on these features, go to Relyence Reliability Prediction Advanced Features.