Customizing FMEA Risk Criteria
You can customize all elements of your risk assessment criteria in Relyence FMEA: Severity, Occurrence or Frequency, and Detection or Monitoring levels, as well as the RPN (Risk Priority Number) or AP (Action Priority) calculations, and the color-coding of Severity, Occurrence, Detection, RPN and AP values on your FMEA Worksheets. Relyence FMEA sets the most commonly used rank and criteria definitions for FMEAs, but any or all of these can be modified to meet your requirements.
To customize the risk criteria, from the Sidebar menu, click Configure>FMEA>Risk Criteria.
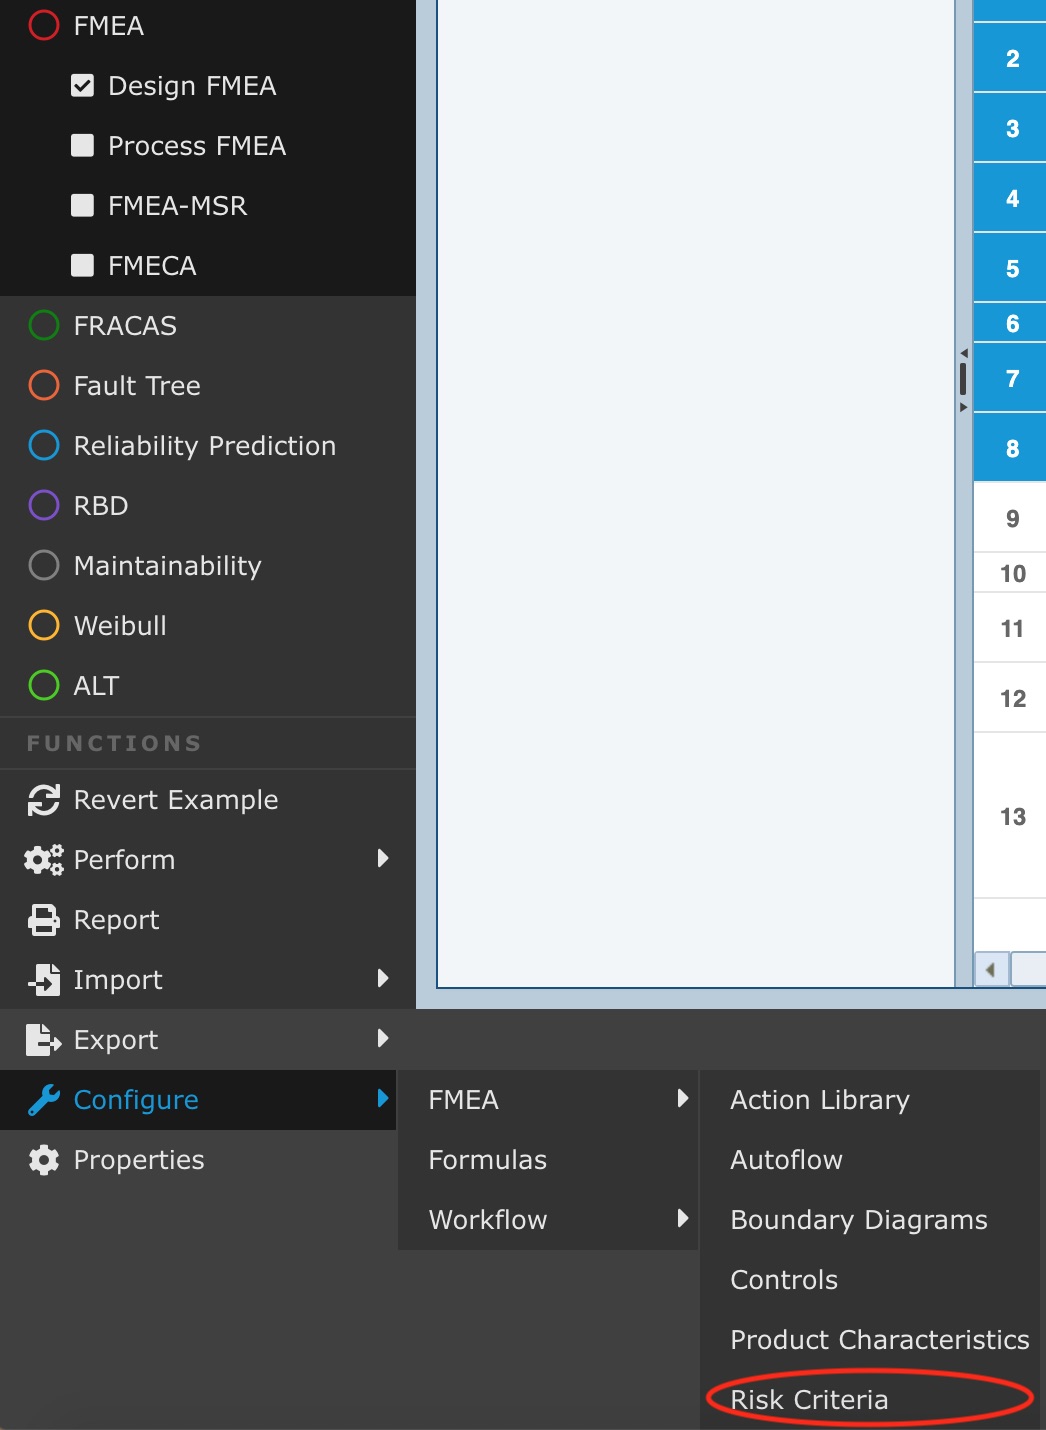
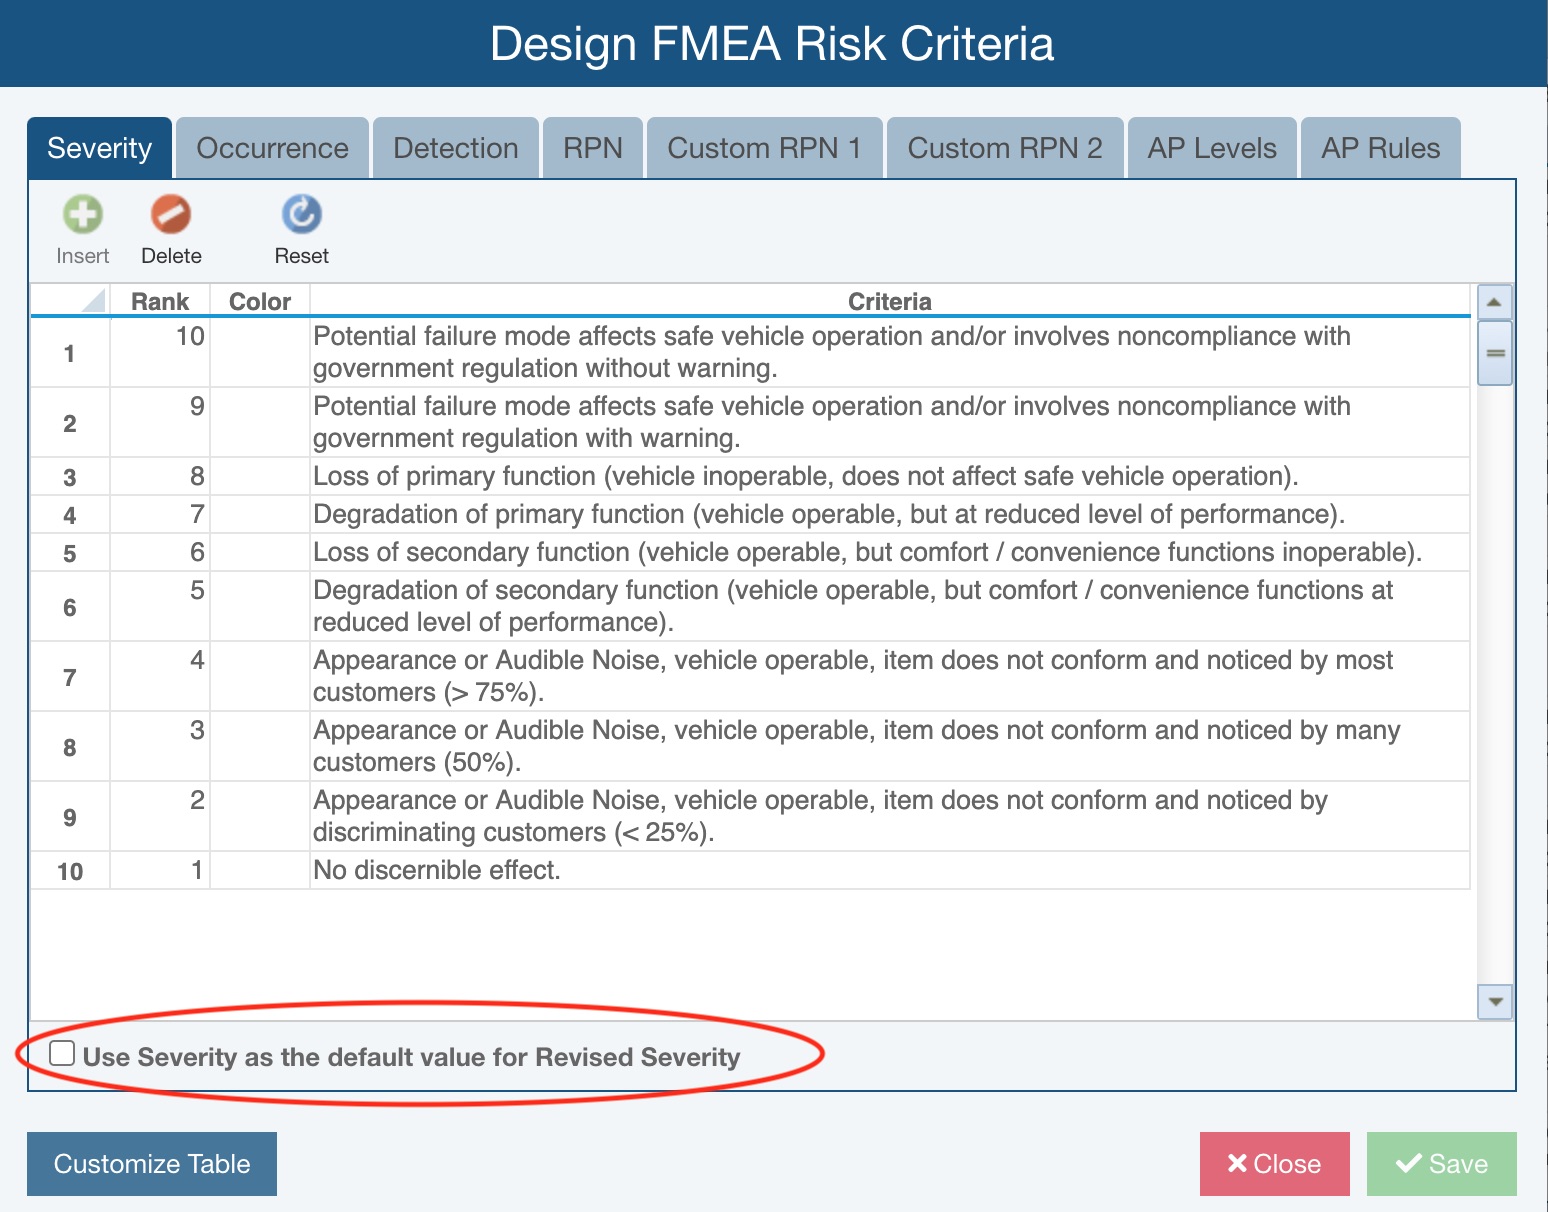
The Risk Criteria dialog appears.
.jpg)
Customizing Severity, Occurrence or Frequency, and Detection or Monitoring
The settings for Severity, Occurrence or Frequency, and Detection or Monitoring each appear on a separate tab.
By default, Relyence sets default data for Rank, Color and Criteria for Severity, Occurrence or Frequency, and Detection or Monitoring. You can modify the Rank, Color and Criteria as you desire. You Insert and Delete list items. A maximum of 10 items can be in the Severity, Occurrence or Frequency, and Detection or Monitoring tables.
If you would like to use more than one column in your risk criteria tables or want to change the column headings of your risk tables, click the Customize Table button. The Criteria Columns dialog appears.
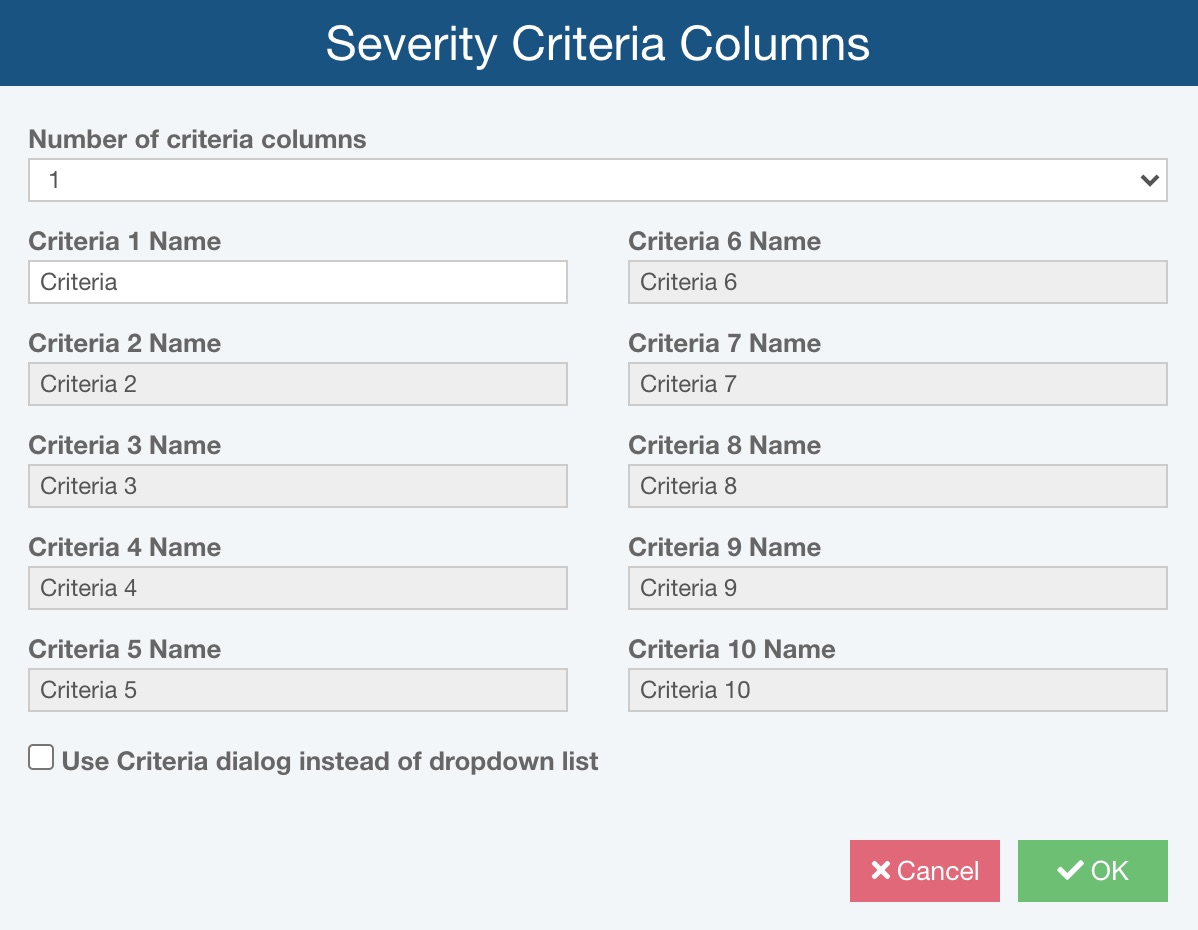
Select the Number of criteria columns you want to use from 1-10. Enter the Criteria Name, or column heading, for each of your criteria columns.
For example, the Severity list could include 3 criteria: Level, Description, and % Customers Affected.
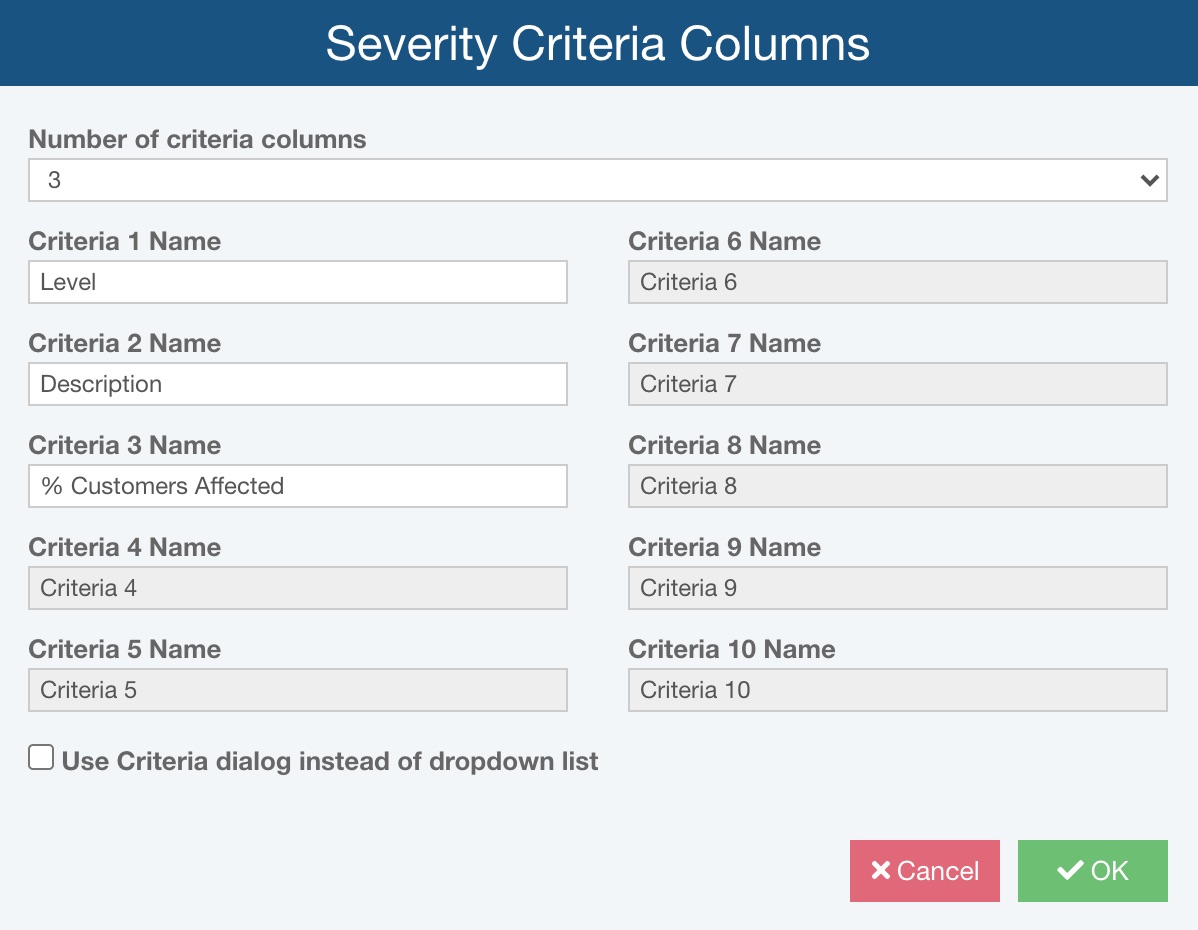
On the bottom of the Criteria Columns dialog, you can also select Use Criteria dialog instead of dropdown list.
This impacts how you can select the applicable criteria as shown below on the FMEA Worksheets. Note that if you choose to use more than 3 criteria, the Use Criteria dialog instead of dropdown list field is checked on by default and disabled, thus requiring you to use the Criteria dialog to select the appropriate Severity.
Click OK to save your modifications.
The customized table would look as shown here, with the customized criteria columns and the applicable data.
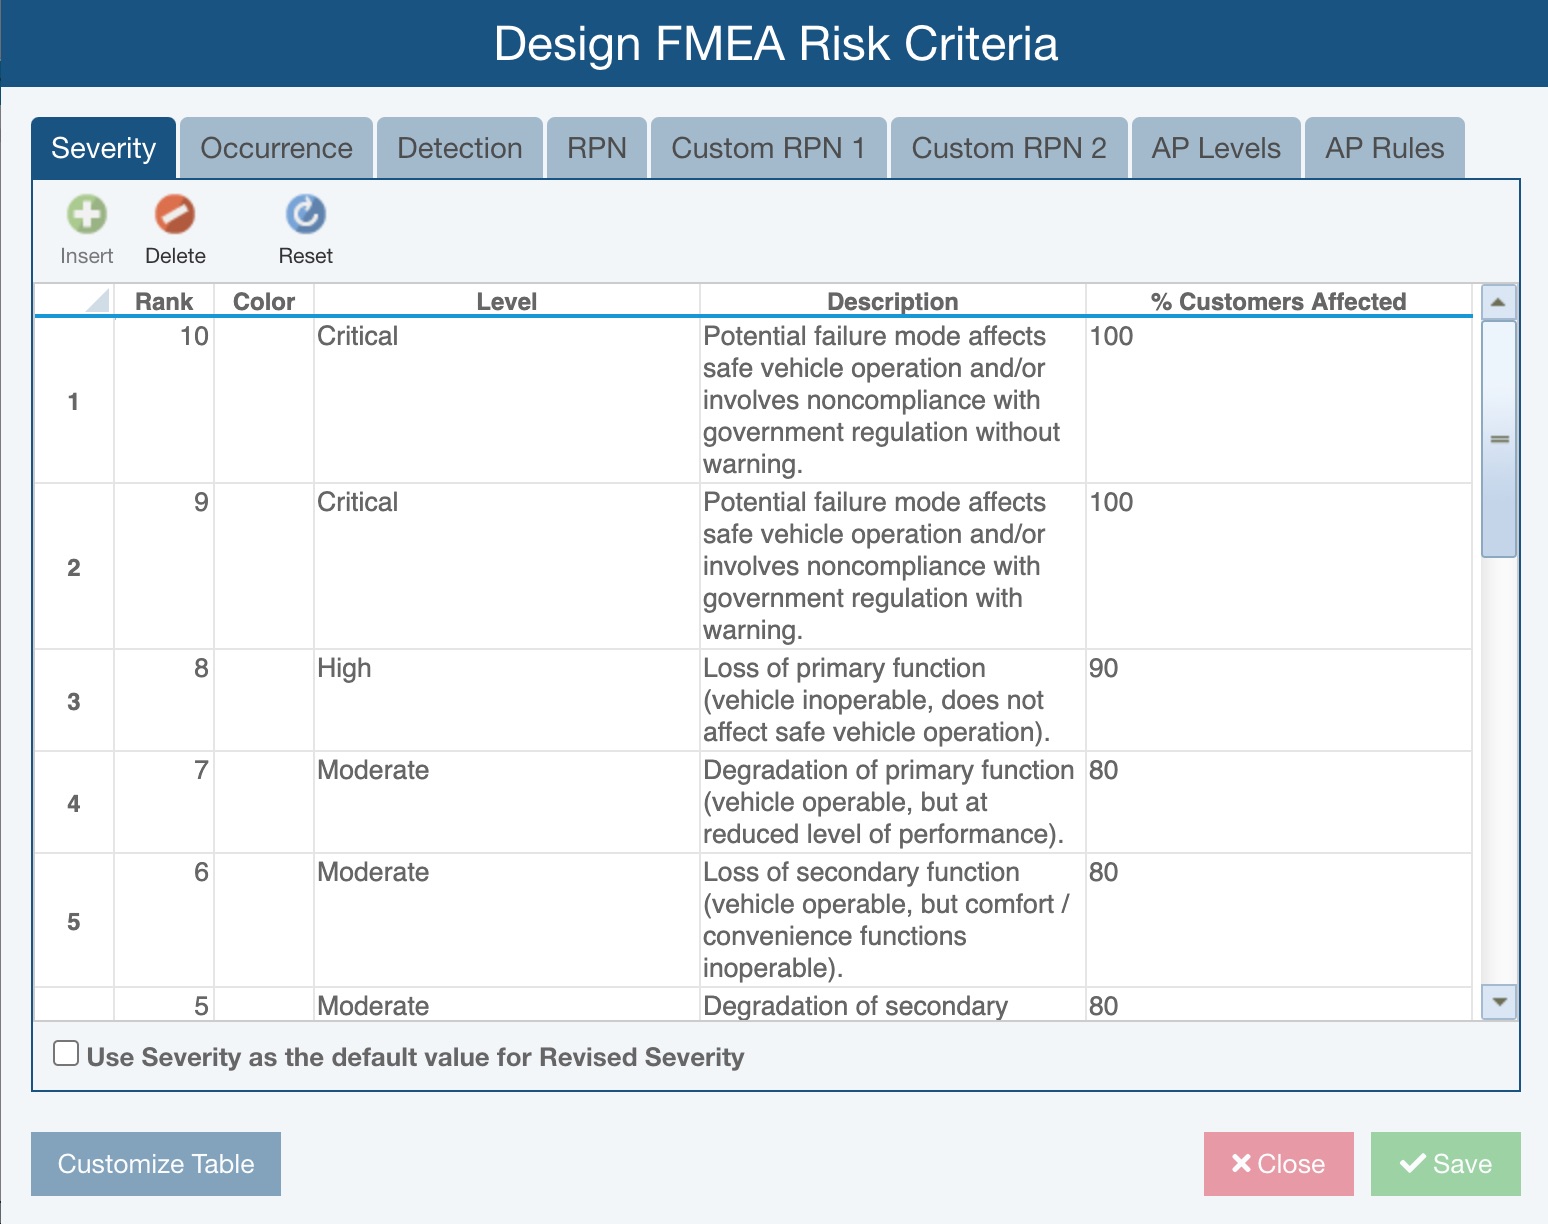
For all FMEA types, except FMECA, you can also check the option to allow the original value for Severity, Occurrence or Frequency, or Detection or Monitoring to be used as the default for the revised value. For example, if you check Use Severity as the default value for Revised Severity, wherever the Revised Severity is blank, it will have the Severity value displayed. Where needed, you can set the Revised Severity accordingly by selecting or entering the desired value.
You can customize Occurrence or Frequency and Detection or Monitoring in the same manner. The values entered in the Rank columns are used when computing RPN or determining AP values. The other columns are for cosmetic or informational purposes.
When you have completed your customization, click Save and Close.
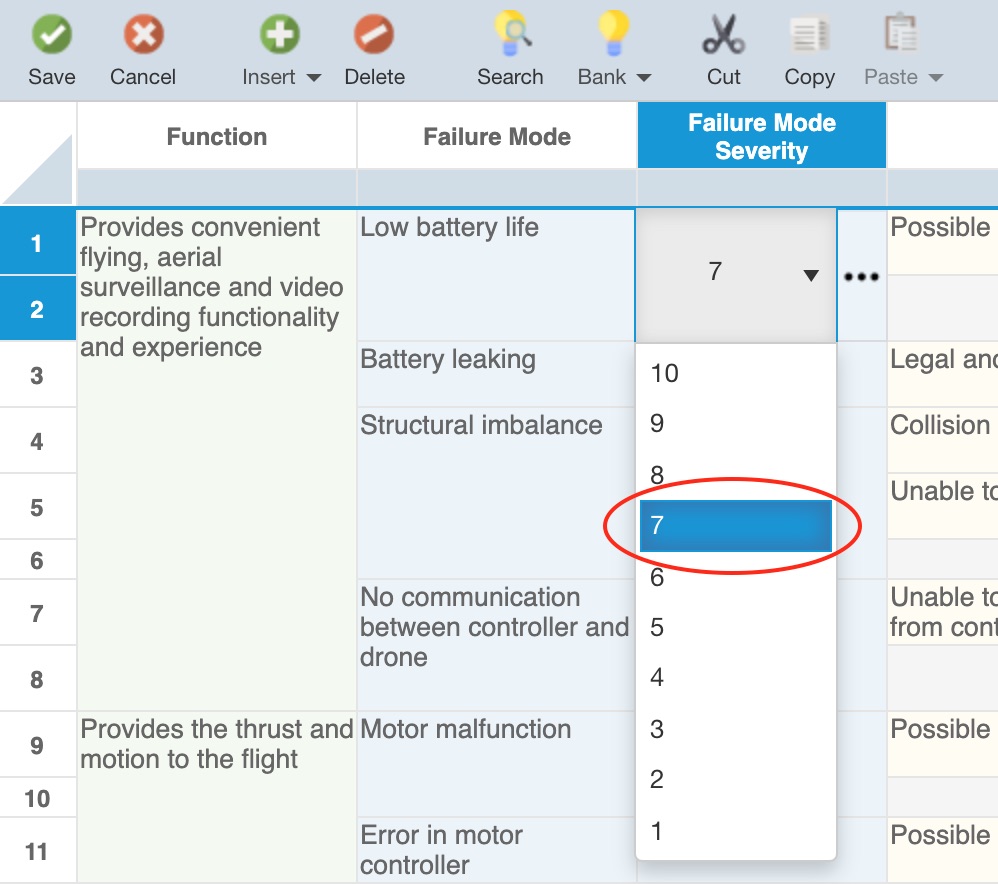
Once customized, your FMEA Worksheets will display your risk tables in the Severity, Occurrence or Frequency and Detection or Monitoring dropdown lists or provide access to the Severity, Occurrence or Frequency and Detection or Monitoring dialog, as shown below.
This shows selecting the customized criteria from the default dropdown list.
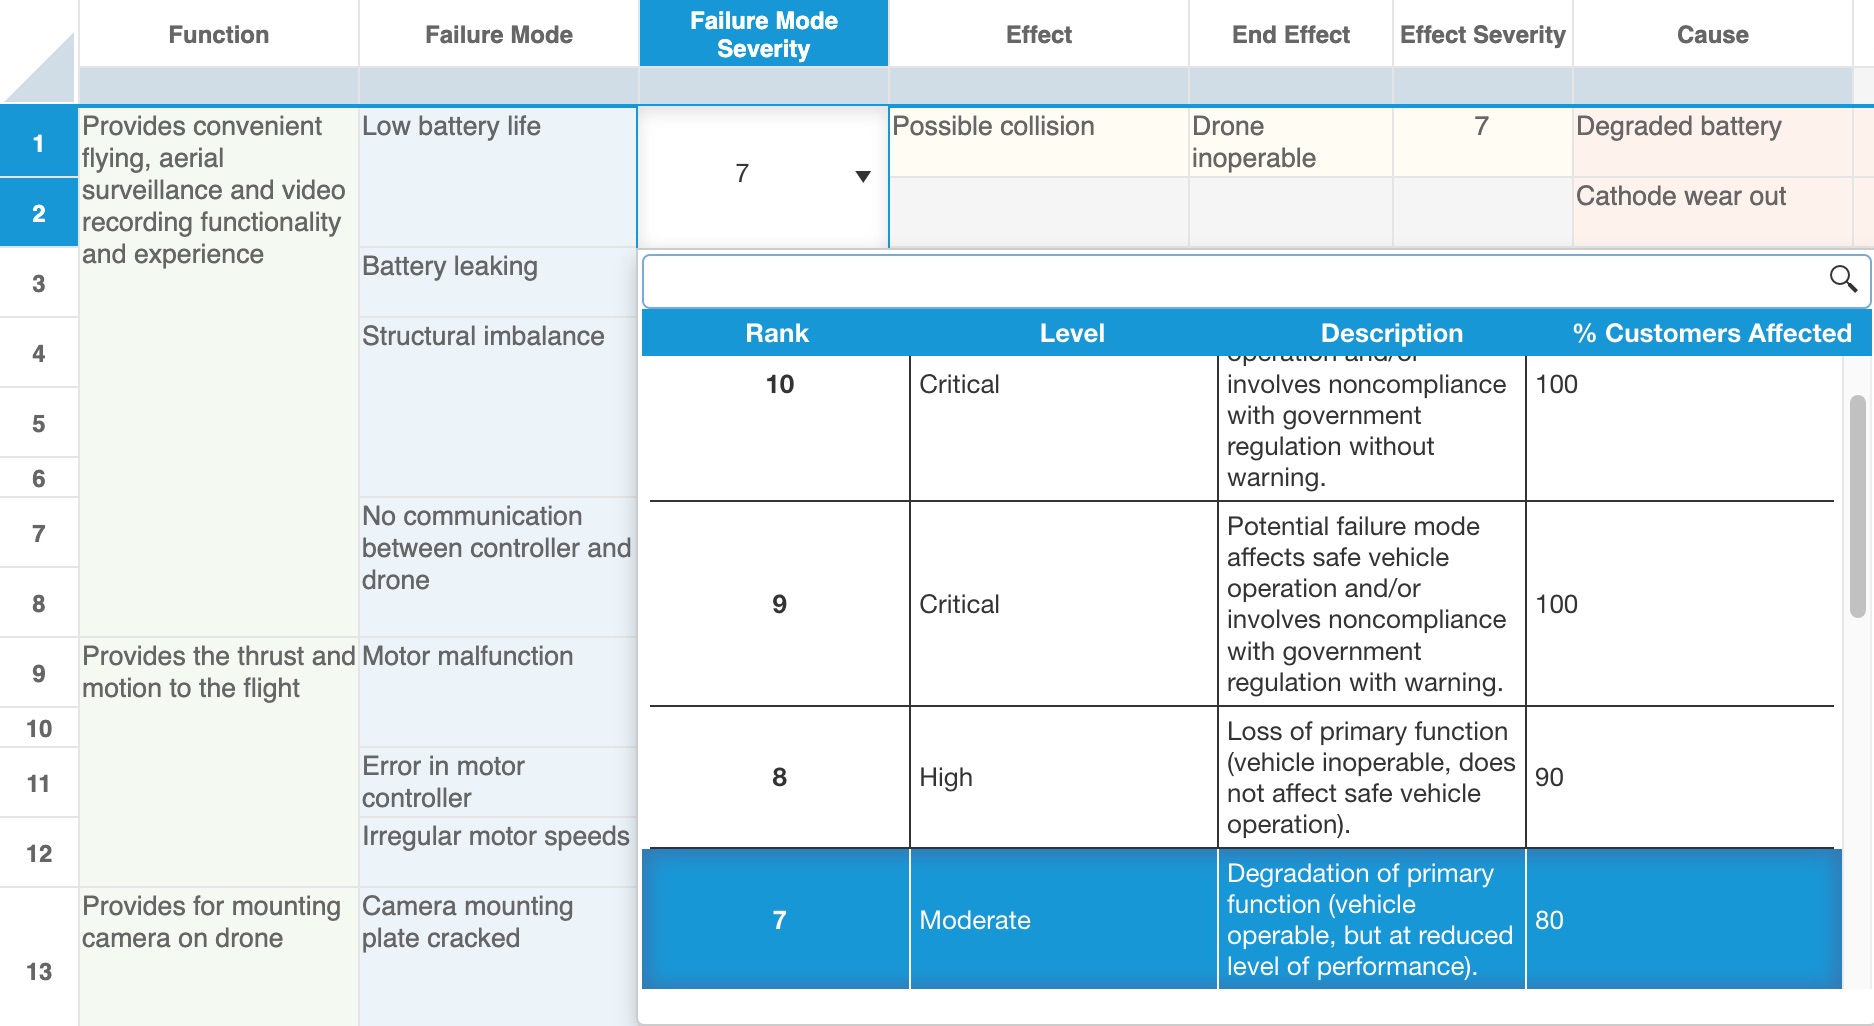
This shows selecting the customized criteria from the criteria dialog; this is applicable when Use Criteria dialog instead of dropdown list is checked on the Criteria Columns dialog.
You can still simply choose the value for the criteria, such as Severity, from the choices.
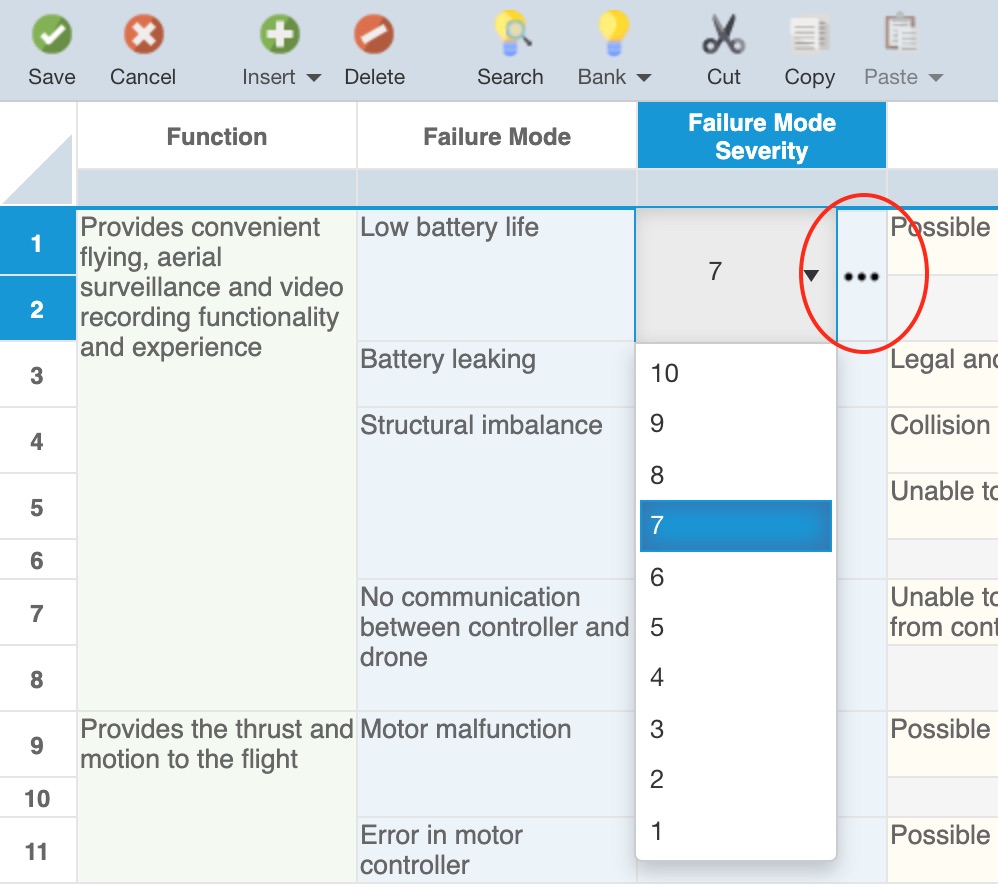
Or, if you click the Control Selector button on the right of the field, the applicable criteria dialog appears.
On the applicable criteria dialog, such as the example pictured here, you can use the Find option, if needed, to locate specific details and then select the appropriate criteria value using the checkmark in the leftmost column of the table.
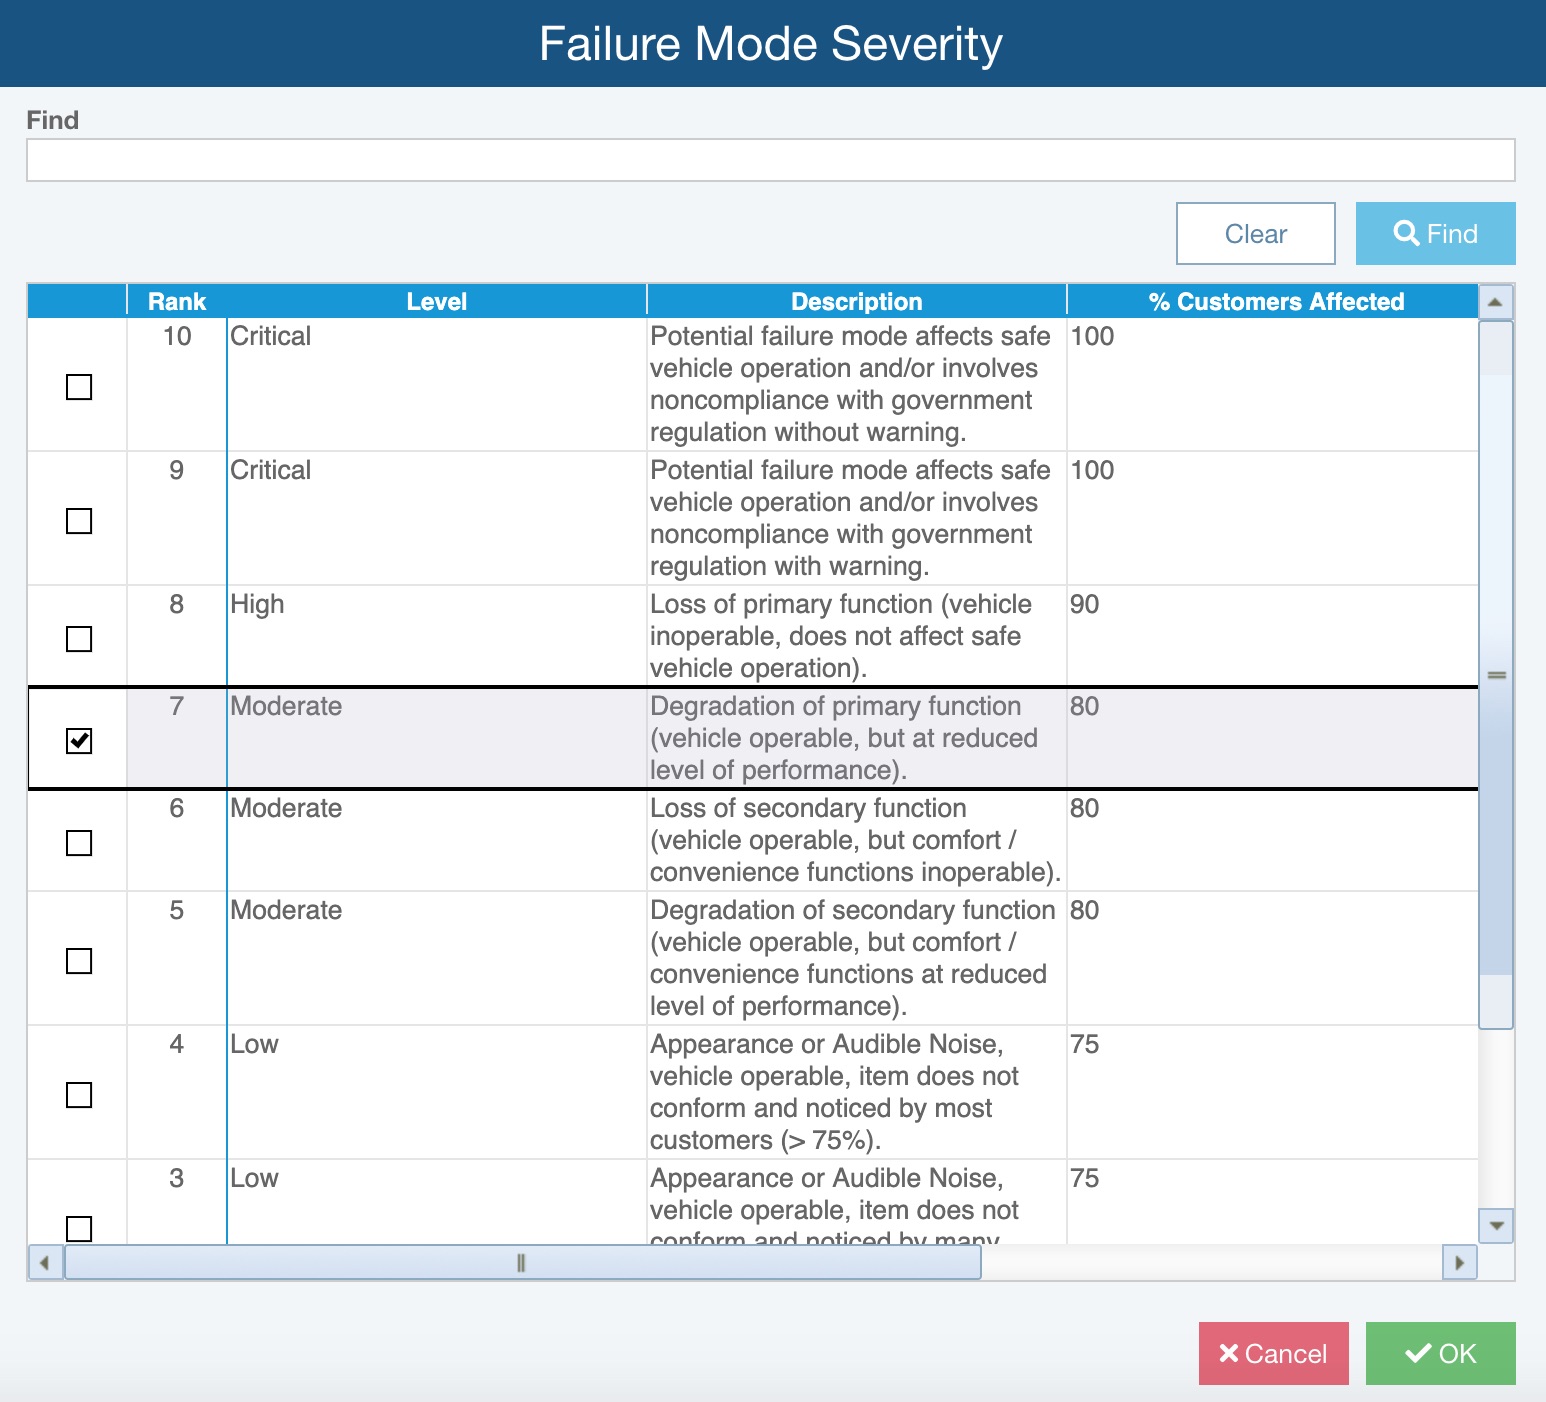
Click OK once you've made the correct selection.
Customizing RPN Calculations
You can have up to three different RPN calculations in your FMEA Worksheets. You can customize all three of the RPN calculations in any way you choose. All three RPN customization tabs work in the same manner.
Note that the Custom RPN 1 and Custom RPN 2 fields will not appear by default on the supplied FMEA Worksheet Views, you will need to customize your FMEA Worksheet to add these fields.
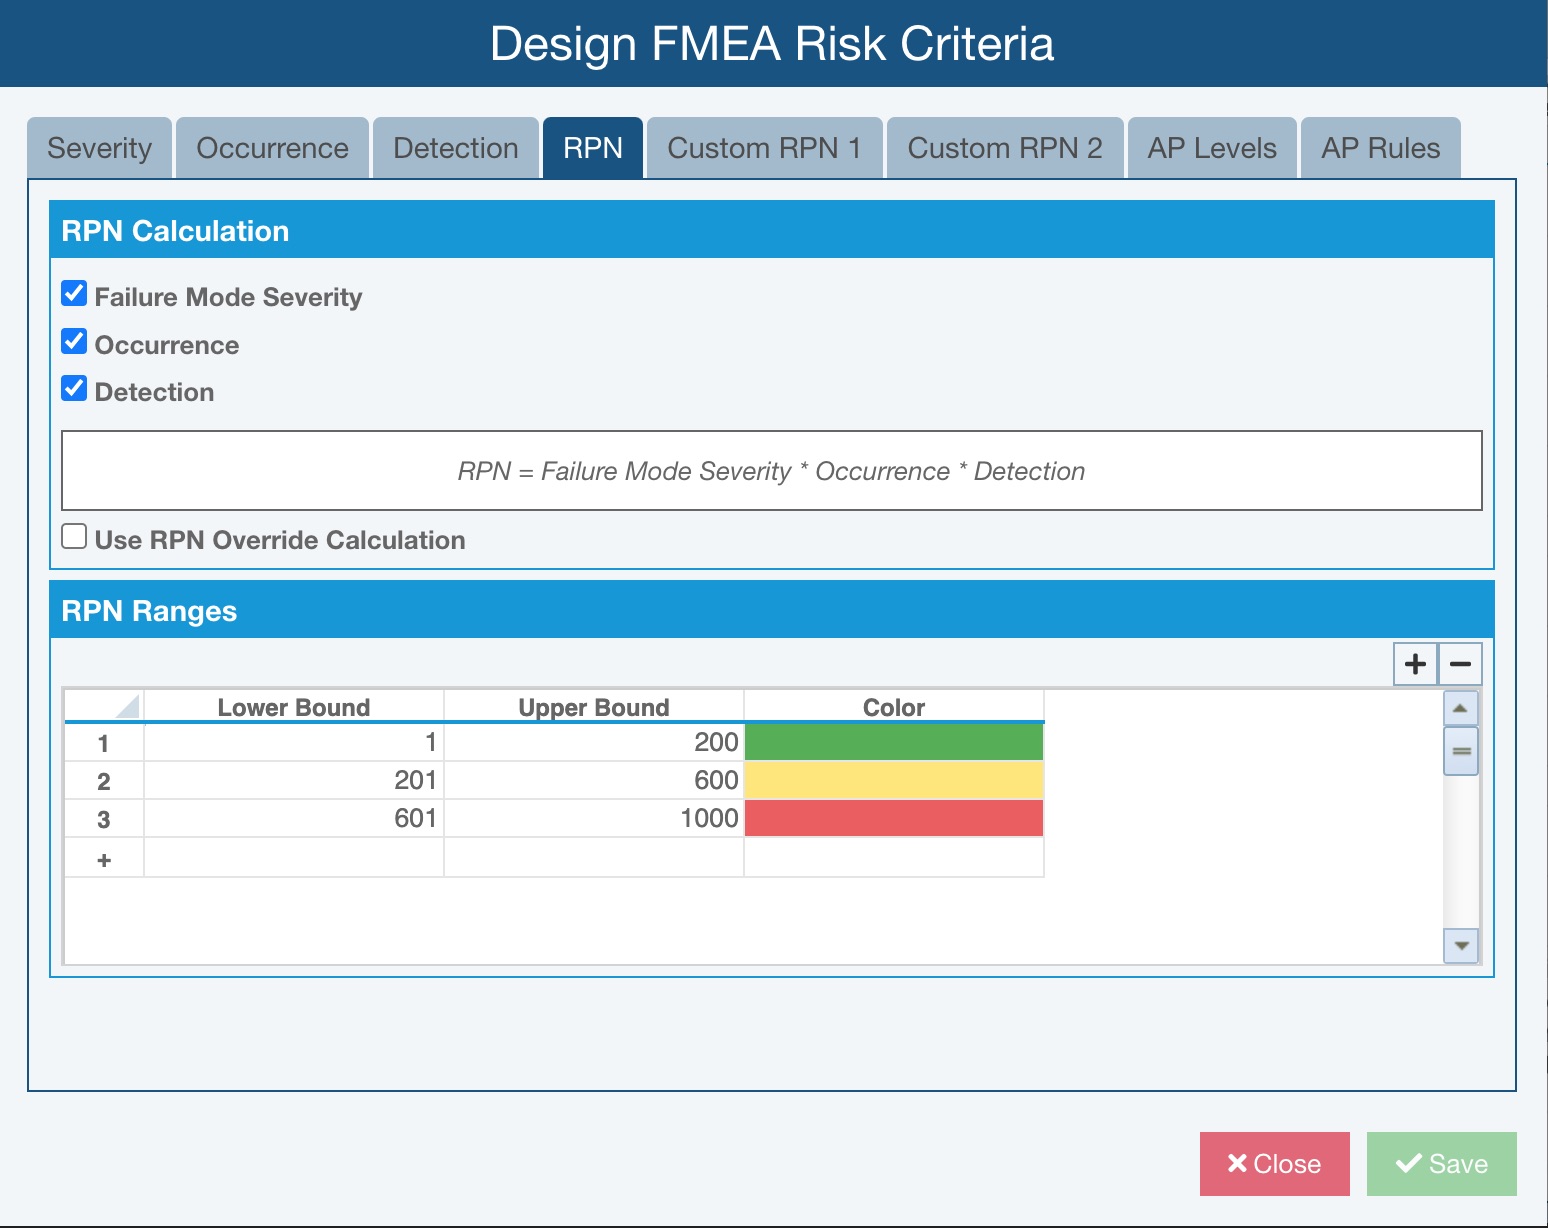
By default, Relyence sets a single RPN value to Severity * Occurrence * Detection and sets three color-coding levels.
You can choose which elements to include in the RPN calculation by selecting the checkbox next to the appropriate items.
Or, you can select Use RPN Override Calculation to specify how the RPN is calculated. The RPN Override Calculation allows you to set a specified RPN value dependent on the values of Severity, Occurrence, and Detection. For example, the following will set RPN to 1000 if the Severity value is greater than or equal to 8 and if either Occurrence or Detection is greater than to equal to 3.

Customizing RPN Color Coding
RPNs are automatically color-coded in your FMEA Worksheet based on the ranges specified. By default, 3 ranges are set using the green, yellow, and red colors.
You can add any number of RPN ranges and assign your own color preferences. Enter your color-coding preferences in the RPN Ranges table. To insert a new range, click the [+] icon in the upper right of the table. To delete a range, click the [-] icon in the upper right.
Enter the Lower Bound and Upper Bound or each range. Click the Color column to access the color picker control to select the desired color and click the Apply button.
Customizing Action Priority
You can customize the Action Priority (AP) level settings as well as the rules used to determine AP levels.
To customize the AP levels and their associated colors, use the AP Levels tab.
The customize the rules for AP level determination, use the AP Rules tab. You can define the lower and upper bounds for Severity, Occurrence, and Detection to use for assessing the AP levels.
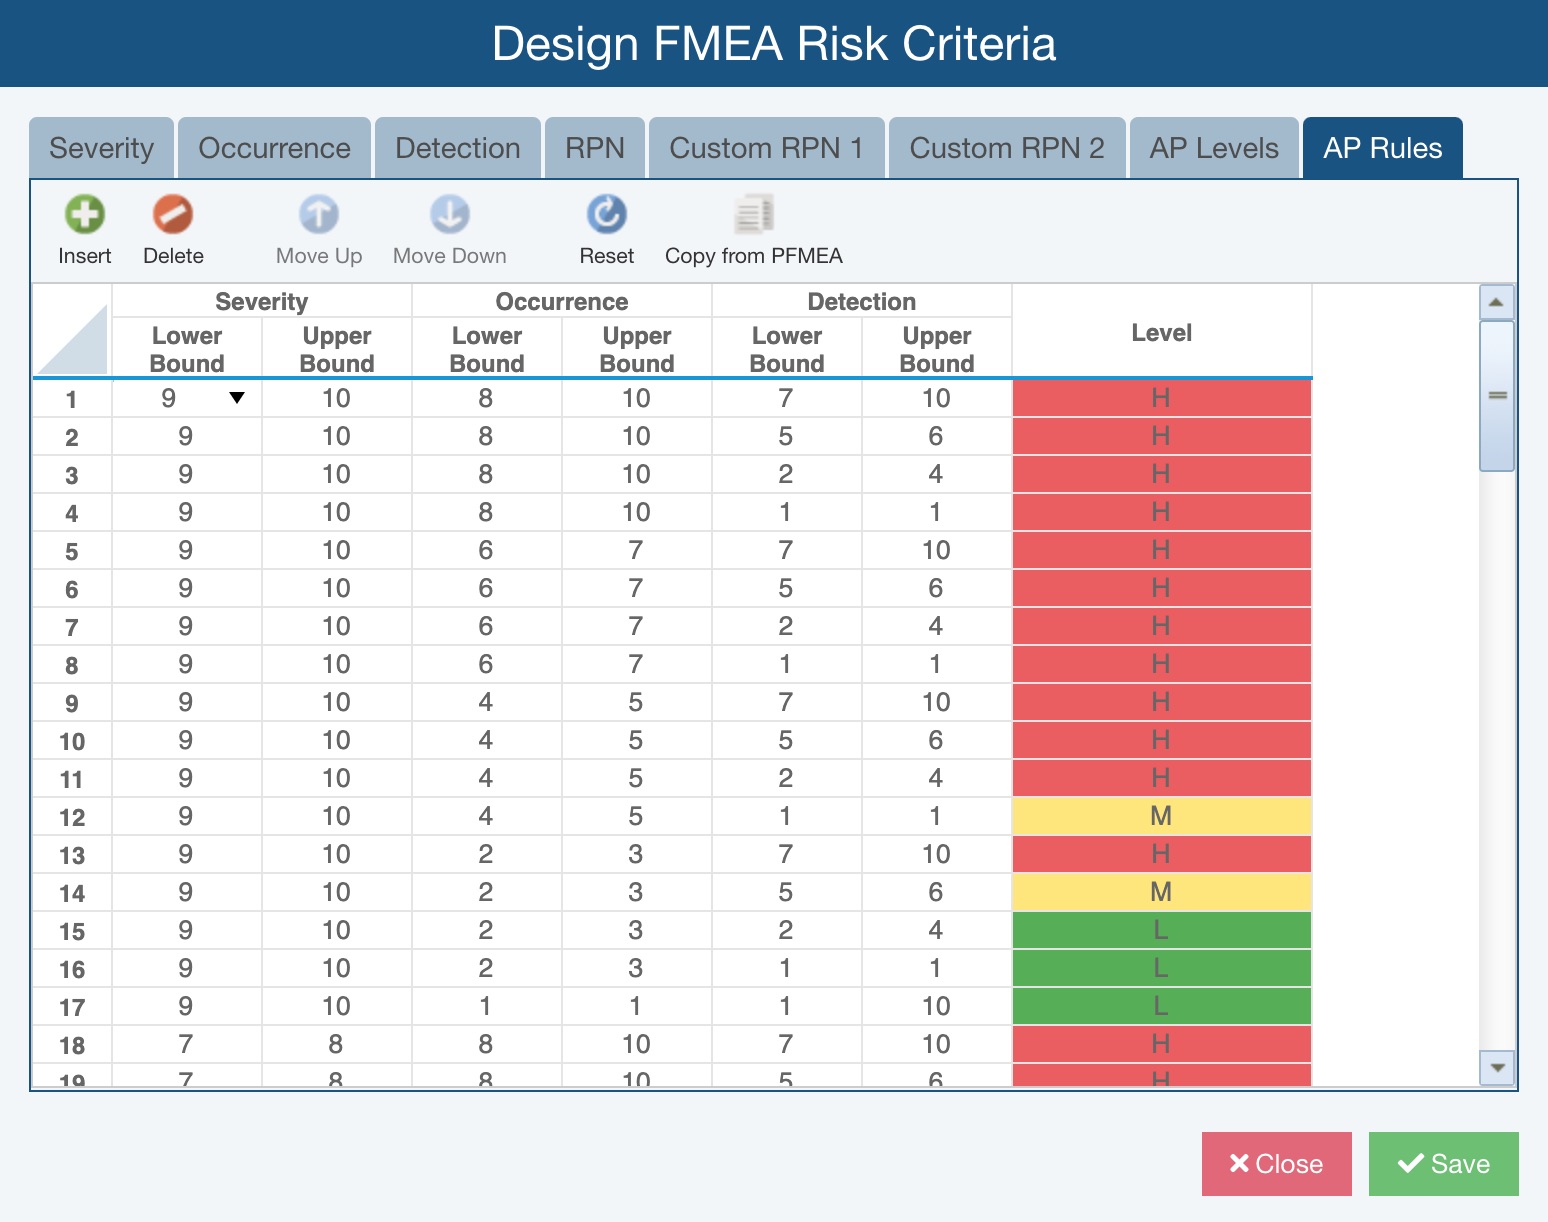
The Reset toolbar button will reset the table back to Relyence defaults, which are AP levels defined in the AIAG & VDA FMEA Handbook.
The Copy from toolbar button enables you to copy rules you have set up in another FMEA type. For example, if you have already defined your AP rules for DFMEA, you can copy those rules over for your PFMEAs. The Copy from function means you only have the define your rules in one place and copy them as needed. This is only useful if you want to use the same AP rules across all your FMEA types.